1. Introduktion
Thank you for choosing the Walfront LCD Digital Programmable Weekly Timer Switch. This device is designed for automatic control of various electrical appliances based on user-defined schedules. Please read this manual carefully before installation and operation to ensure proper use and to prevent damage.
2. Säkerhetsinformation
Varning: Electrical installation should only be performed by qualified personnel. Disconnect power before installation or maintenance to prevent electric shock.
- Se till att ingångsvolymentage matches the timer's specifications (24V for this model).
- Överskrid inte den maximala belastningskapaciteten på 16A 250VAC (resistiv belastning).
- Håll enheten borta från vatten och hög luftfuktighet.
- Försök inte att ta isär eller reparera enheten själv. Kontakta supporten om problem uppstår.
3. Produkt överview
The Walfront LCD Digital Programmable Weekly Timer Switch is a high-precision device built with durable, moisture-resistant, and corrosion-protected materials. It features a clear LCD display and supports up to 16 ON/OFF programs daily and weekly.
3.1 Nyckelfunktioner
- High-quality construction for long lifespan.
- Automatic ON/OFF control for various electrical devices.
- Built-in 1.2V/40mA rechargeable battery for memory retention.
- Industrial-grade chip for high precision and strong anti-interference.
- Up to 16 ON and 16 OFF programming settings per day/week.
- LCD display showing real-time, hour, minute, and ON/AUTO/OFF status.
- DIN rail mounting design.
3.2 komponenter

Bild 1: Främre view of the Walfront LCD Digital Programmable Weekly Timer Switch. Shows the LCD display and control buttons.

Bild 2: Tillbaka view of the timer switch, illustrating the wiring terminals and basic electrical specifications printed on the unit.
4. Installation och installation
This timer is designed for DIN rail mounting. Ensure the DIN rail is securely installed before attaching the timer.
4.1 Kopplingsschema

Bild 3: Wiring diagrams showing direct connection (left) and connection with an AC contactor (right). The direct connection illustrates neutral and live wire inputs and load output. The AC contactor diagram shows 220V power input and output to the load device.
Direct Wiring: Connect the neutral and live wires to the designated input terminals (L and N). Connect the load to the output terminals (typically 3 and 4 for normally open, or 3 and 5 for normally closed, as indicated on the device). Refer to the diagram on the device for exact terminal numbering.
Wiring with AC Contactor: For higher loads, connect the timer to control an AC contactor. The timer's output will switch the coil of the contactor, which in turn controls the main power to the load. This setup is shown on the right side of Image 3.
4.2 Första uppstart och batteriladdning
Upon first use, connect the timer to power. The internal 1.2V/40mA rechargeable battery will begin charging. If the display is blank or shows incorrect time, allow it to charge for a few minutes. Press the "Reset" button (often labeled with a small 'R' or 'C' and requires a pointed object) to clear all settings and start fresh.
5. Bruksanvisning
5.1 Ställa in aktuell tid
- Tryck på "CLOCK" button (often labeled with a clock icon) and hold it.
- Medan du håller "CLOCK", tryck på "D+" för att ställa in aktuell veckodag.
- Medan du håller "CLOCK", tryck på "H+" för att ställa in den aktuella timmen.
- Medan du håller "CLOCK", tryck på "M+" för att ställa in aktuell minut.
- Släpp "CLOCK" knappen. Tiden är nu inställd.
5.2 Setting 12/24 Hour Mode
By default, the timer operates in 24-hour mode. To switch between 12-hour (AM/PM) and 24-hour modes, press and hold the "CLOCK" button for approximately 5 seconds. The display will show "AM" for 12-hour mode or switch back to 24-hour format.
5.3 Programmering av PÅ/AV-scheman
The timer supports up to 16 ON and 16 OFF programs. Each program consists of an ON time and an OFF time.
- Tryck på "PROG" knappen en gång. Displayen visar "1 PÅ".
- Trycka "D+" to select the day(s) for this ON program (e.g., Mon-Fri, Sat-Sun, or specific days).
- Trycka "H+" för att ställa in önskad PÅ-timme.
- Trycka "M+" för att ställa in önskad PÅ-minut.
- Trycka "PROG" igen. Displayen visar "1 AV".
- Upprepa steg 2–4 för att ställa in AVSTÄNGNINGStiden för det första programmet.
- Fortsätt att trycka "PROG" to cycle through "2 ON", "2 OFF", up to "16 ON", "16 OFF", setting each as needed.
- När du har ställt in alla önskade program, tryck på "CLOCK" button to exit programming mode and return to real-time display.
Notera: If you need to cancel a program, press the "PROG" button to select the program, then press the "MANUELL" button until "----" appears on the display for that program's time slot.
5.4 Manuell överstyrning (PÅ/AUTO/AV)
Tryck på "MANUELL" knapp för att växla mellan driftslägena:
- PÅ: The output is continuously ON, ignoring all programs.
- BIL: Timern fungerar enligt de programmerade PÅ/AV-schemana.
- OFF: The output is continuously OFF, ignoring all programs.
Se till att timern är igång "AUTO" läge för programmerad drift.
5.5 Knapplåsfunktion
To prevent accidental changes to settings, the timer features a key lock function.

Bild 4: The timer display showing the key lock symbol, indicating that the buttons are locked.
- To lock the keys: Press and hold the "C/R" (Cancel/Reset) button for approximately 4 seconds until a lock symbol appears on the LCD.
- To unlock the keys: Press and hold the "C/R" button again for approximately 4 seconds until the lock symbol disappears.
6. Specifikationer
| Parameter | Värde |
|---|---|
| Ingång Voltage | AC/DC 24V (This model) |
| Contact Rated Voltage | AC 180V~264V (50/60Hz) |
| Lastkapacitet | 16A 250VAC (Resistive Load) |
| PÅ/AV-funktioner | 16 ON / 16 OFF (Manual/Auto) |
| Visa | LCD |
| Energiförbrukning | 4.5VA (Max) |
| Fel | ≤2 seconds/day (at 25℃) |
| Monteringsmetod | DIN Rail (sold separately) |
| Tidsintervall | 1 minut till 168 timmar |
| Minsta intervall | 1 minut |
| Driftstemperatur | -10℃ till 55℃ |
| Driftfuktighet | 35-85 % RH |
| Mått (L x B x H) | 86 x 36 x 65 mm |
| Internt batteri | 1.2V/40mA rechargeable, >15 days backup |
| Antal kretsar | Changeover switch (SPDT) |
| Livslängd | Mechanical: 107, Electrical: 105 |
| Vikt | 125g |
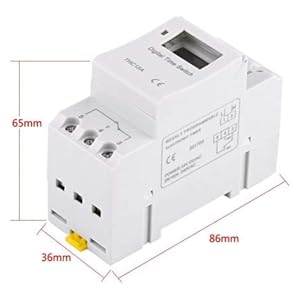
Bild 5: Diagram illustrating the dimensions of the timer switch: 86mm length, 36mm width, and 65mm height.
7. Underhåll
- Håll timern ren och fri från damm. Använd en torr, mjuk trasa för rengöring.
- Använd inte slipande rengöringsmedel eller lösningsmedel.
- Kontrollera regelbundet kabelanslutningarna för att säkerställa att de är säkra.
- The internal battery is designed for long life and typically does not require replacement. If the timer loses settings frequently after power outagkan batteriet behöva service av en kvalificerad tekniker.
8. Felsökning
| Problem | Möjlig orsak | Lösning |
|---|---|---|
| Displayen är tom. | No power supply or internal battery discharged. | Check power connections. Allow the timer to charge for a few minutes after connecting to power. |
| Timern slås inte PÅ/AV som programmerat. | Timer is not in "AUTO" mode, programs are incorrect, or key lock is active. | Press "MANUAL" until "AUTO" is displayed. Review and correct programs. Unlock keys if necessary. |
| Knapparna svarar inte. | Knapplåsfunktionen är aktiv. | Press and hold "C/R" for 4 seconds to unlock the keys. |
| Tiden är felaktig. | Minor drift (within specifications) or internal battery issue. | Reset and re-set the time. If inaccuracy persists or settings are lost frequently, contact support. |
9. Garanti och support
Walfront strives to provide high-quality products. If you encounter any issues with your product, please contact us for prompt assistance. We offer return and refund services for product defects.
For support, please refer to the contact information provided with your purchase or visit the Walfront store on Amazon: Walfront Amazon-butik.