1. Introduktion
Thank you for choosing the CREATE SILKAIR CONNECT 3-in-1 Mobile Air Conditioner. This versatile appliance is designed to provide cooling, dehumidification, and fan functions for your living space. With its Wi-Fi connectivity, you can conveniently control the unit via a mobile application. Please read this manual thoroughly before operation to ensure safe and efficient use.
Modell: 64274_145198
Stämpla: SKAPA
2. Säkerhetsinformation
Följ alltid grundläggande säkerhetsåtgärder när du använder elektriska apparater för att minska risken för brand, elstötar och skador.
- Se till att strömförsörjningen matchar volymentage som anges på klassificeringsetiketten.
- Använd inte enheten med en skadad sladd eller kontakt.
- Håll enheten borta från värmekällor och direkt solljus.
- Blockera inte luftintag eller utlopp.
- Dra alltid ur sladden till enheten före rengöring eller underhåll.
- Denna apparat använder köldmedium R290. Punktera inte köldmediekretsen.
- Håll uppsikt över barn och se till att de inte leker med apparaten.
3. Paketets innehåll
Carefully unpack your air conditioner and check that all items are present and in good condition.
- CREATE SILKAIR CONNECT Mobile Air Conditioner Unit
- Avgasslang
- Window Sealing Kit (Adjustable window slider, hose adapter)
- Fjärrkontroll
- Användarmanual

Figure 1: The CREATE SILKAIR CONNECT Mobile Air Conditioner unit shown alongside a smartphone displaying its control application interface.
4. Produkt överview
4.1 Kontrollpanel

Figure 2: Close-up of the top-mounted control panel, featuring an LED display and touch-sensitive buttons for various functions such as power, mode selection, fan speed, and timer.
4.2 Komponenter och mått
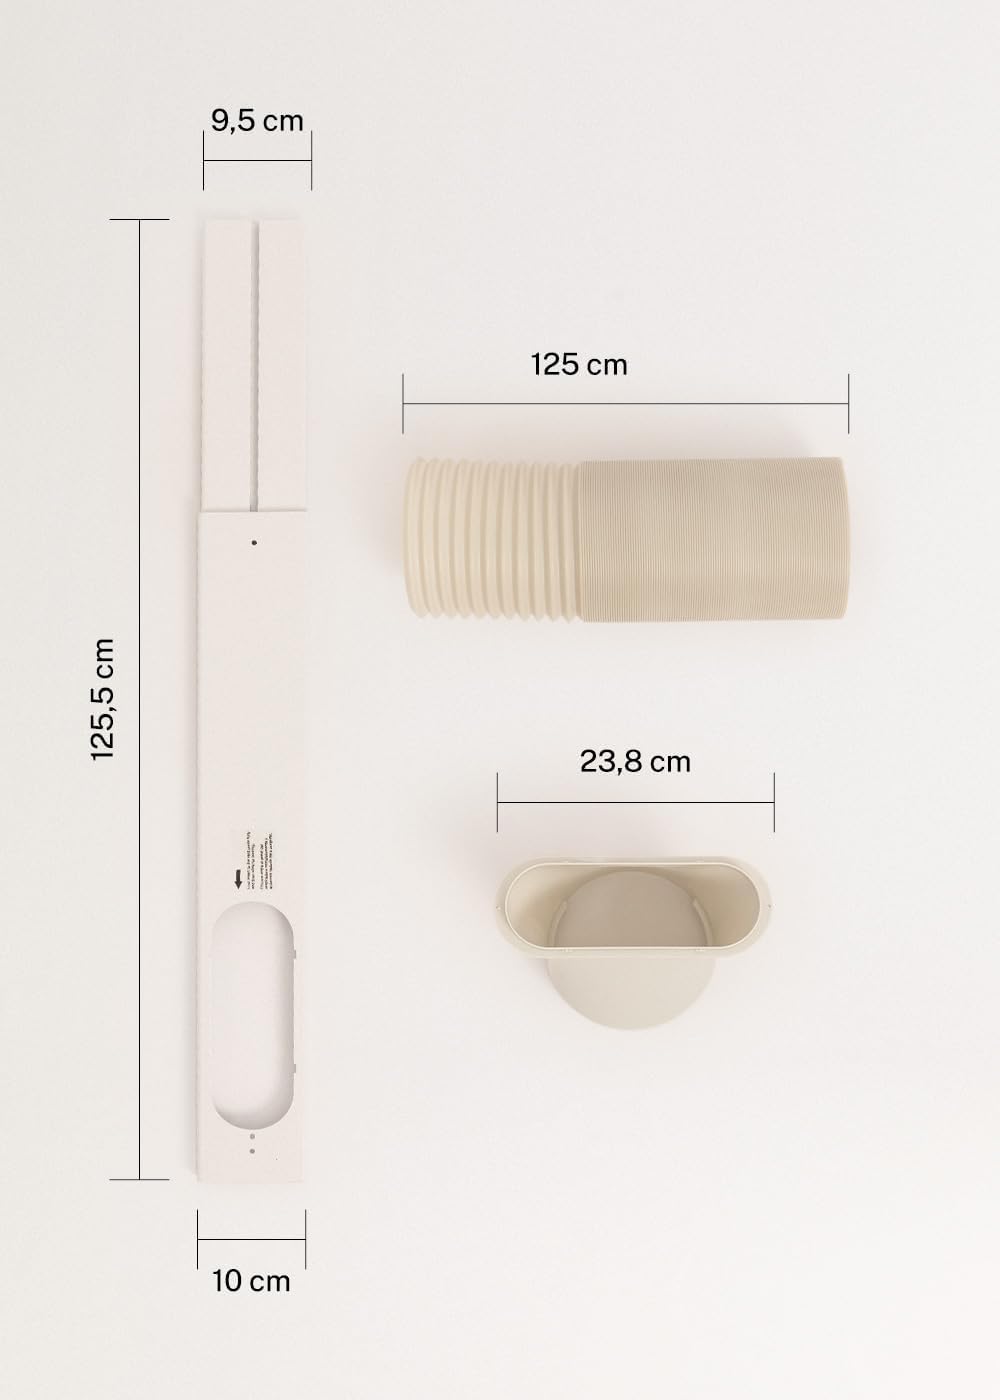
Figure 3: Detailed diagram illustrating the dimensions of the window sealing plate (125.5 cm length, 10 cm width, 9.5 cm adjustable width) and the exhaust hose (125 cm length) with its adapter (23.8 cm diameter).
5. Installation och installation
Proper installation is crucial for the efficient operation of your mobile air conditioner.
5.1 Placering av enheten
- Placera enheten på en plan, stabil yta.
- Se till att det finns minst 30 cm utrymme runt enheten för korrekt luftflöde.
- Position the unit near a window or opening for the exhaust hose.
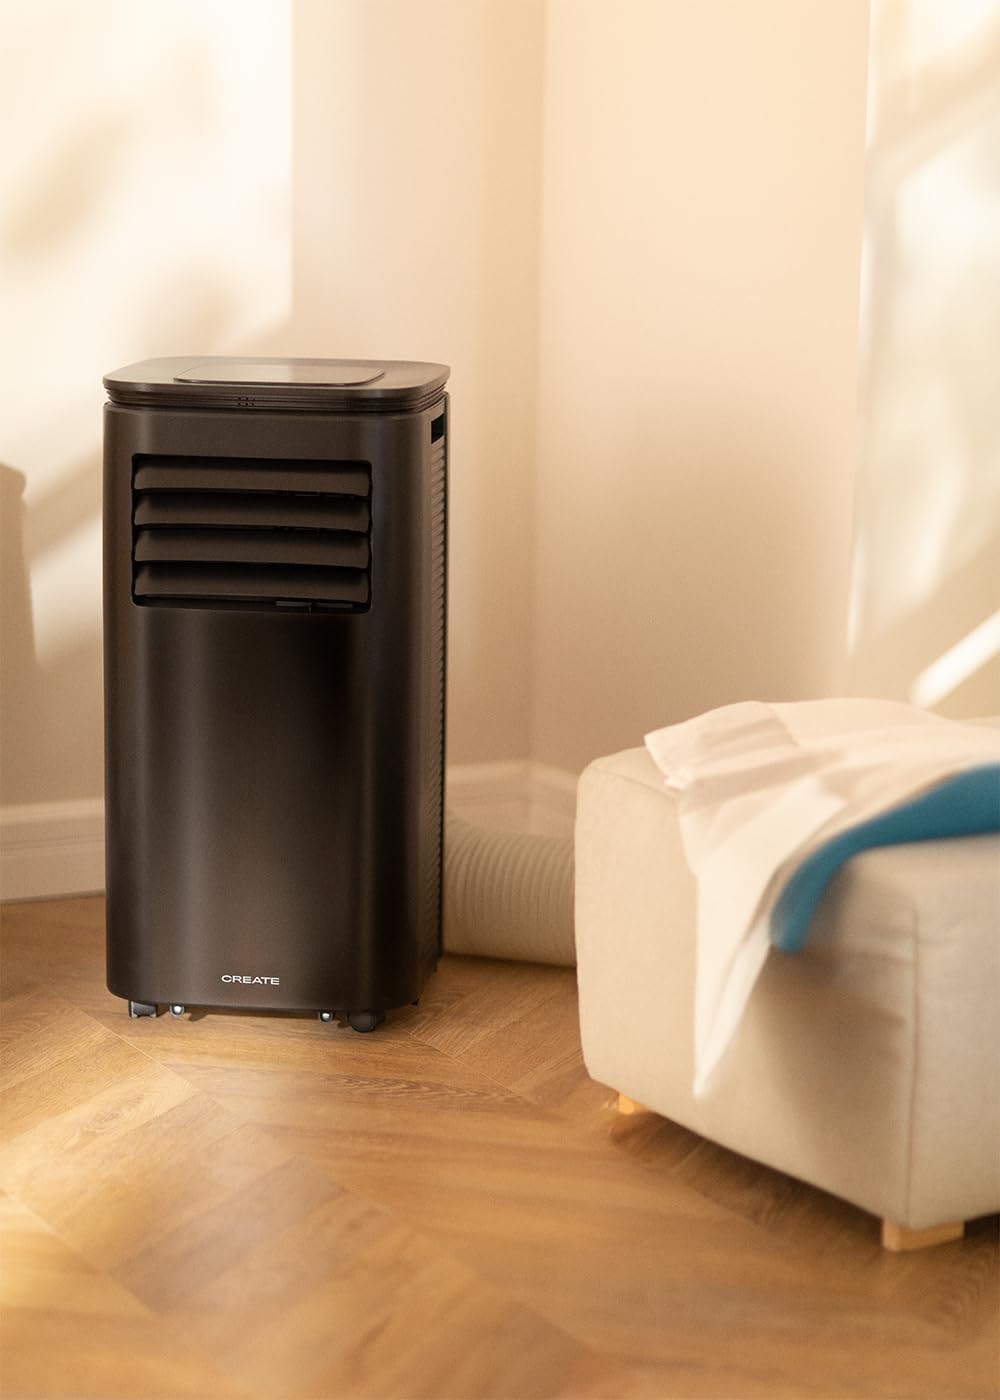
Figure 4: The air conditioner unit positioned in a room, demonstrating the typical setup with the exhaust hose directed towards a window for heat expulsion.
5.2 Installing the Exhaust Hose and Window Kit
- Fäst slangadaptern på ena änden av avgasslangen.
- Connect the other end of the exhaust hose to the air outlet on the back of the unit.
- Install the adjustable window sealing kit in your window opening. Extend it to fit the window frame.
- Insert the hose adapter into the opening of the window sealing kit.

Figure 5: Illustrates the secure connection of the flexible exhaust hose to the designated port at the rear of the air conditioning unit.
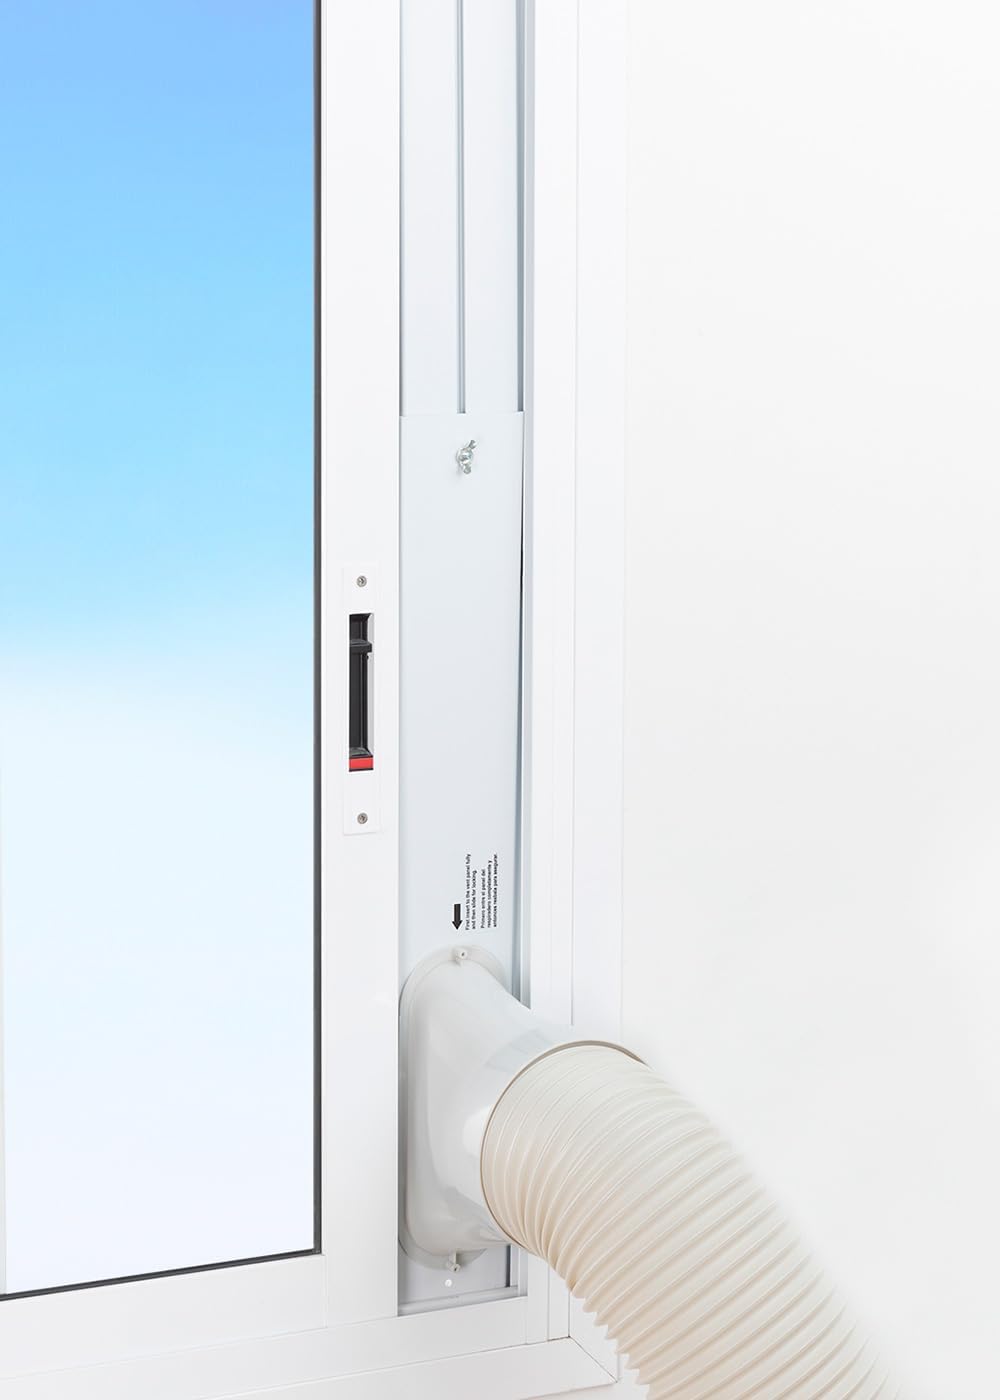
Figure 6: The window sealing kit is shown properly installed in a window frame, with the exhaust hose securely fitted into the kit's opening to vent hot air outside.
6. Bruksanvisning
6.1 Använda kontrollpanelen
The control panel on top of the unit allows direct operation.
- Strömknapp: Tryck för att slå PÅ eller AV enheten.
- Lägesknapp: Cycle through Cooling, Fan, and Dehumidifier modes.
- Fläkthastighetsknapp: Adjust fan speed (Low, High).
- Temperaturknappar (+/-): Adjust desired temperature in Cooling mode.
- Timerknapp: Ställ in timern för automatisk påslagning eller automatisk avstängning (upp till 24 timmar).
- Vilolägesknapp: Aktiverar ett tystare driftläge för nattetid.
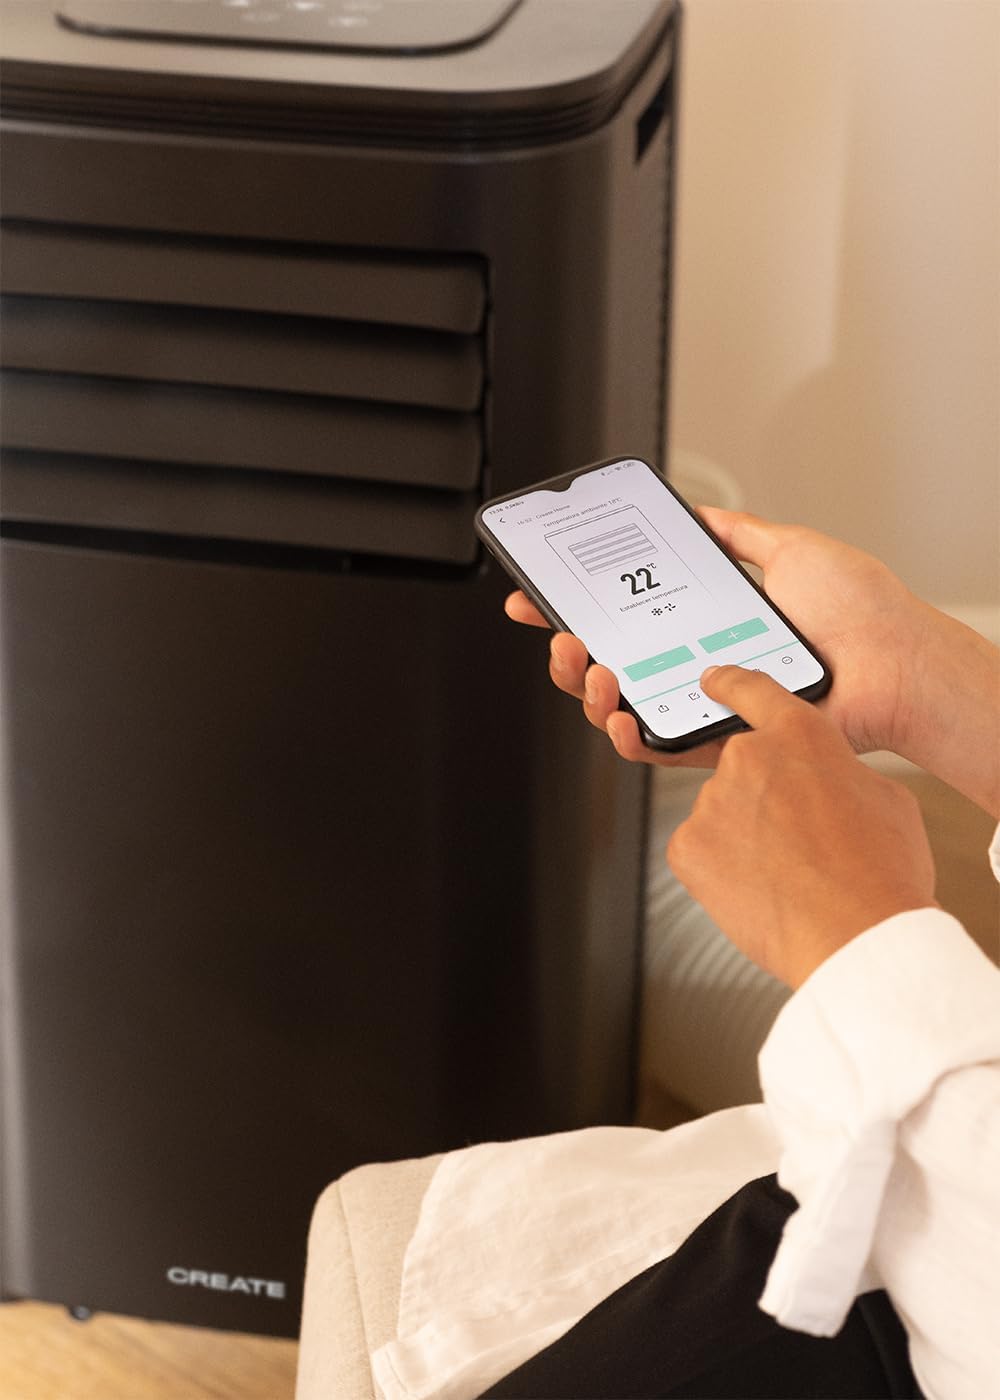
Figure 7: A user's hand interacting with the touch-sensitive control panel located on the top surface of the air conditioner, demonstrating direct manual operation.
6.2 Använda fjärrkontrollen
Fjärrkontrollen ger bekväm manövrering på avstånd.

Figure 8: A hand holding the dedicated remote control for the air conditioner, illustrating its use for convenient operation from a distance.
6.3 Wi-Fi och appkontroll
Download the CREATE Home app from your smartphone's app store. Follow the in-app instructions to connect your air conditioner to your home Wi-Fi network. Once connected, you can control all functions of the unit from your smartphone, including mode selection, temperature adjustment, fan speed, and timer settings.
Figure 9: A user interacting with the mobile application on a smartphone to remotely control the air conditioner, showcasing the Wi-Fi connectivity feature.
7. Underhåll
Regelbundet underhåll säkerställer optimal prestanda och förlänger enhetens livslängd.
7.1 Rengöring av luftfiltret
Luftfiltret bör rengöras varannan vecka eller oftare beroende på användning och luftkvalitet.
- Stäng av enheten och dra ur kontakten från eluttaget.
- Lokalisera luftfilterpanelen på baksidan av enheten.
- Ta försiktigt bort filtret.
- Clean the filter with warm, soapy water or a vacuum cleaner. Rinse thoroughly and allow it to air dry completely before reinserting.

Figure 10: Demonstrates the process of removing the air filter from the rear of the air conditioner unit for cleaning or replacement.
7.2 Tömning av vatten
In Dehumidifier mode or high humidity conditions, the internal water tank may fill up. The unit will stop operating when the tank is full. Drain the water from the drainage port at the bottom rear of the unit.
8. Felsökning
| Problem | Möjlig orsak | Lösning |
|---|---|---|
| Enheten slås inte på | No power; Power cord not plugged in; Water tank full. | Check power outlet; Plug in power cord; Drain water tank. |
| Enheten kyler inte effektivt | Luftfiltret är smutsigt; Avgasslangen är inte korrekt installerad; Rummet är för stort; Dörrar/fönster är öppna. | Clean air filter; Ensure hose is sealed; Use in recommended room size (14-25 m²); Close doors/windows. |
| Högt ljud | Enheten står inte på en plan yta; Blockering i fläkten. | Place on flat surface; Check for obstructions. |
| Problem med Wi-Fi-anslutningen | Felaktigt Wi-Fi-lösenord; Routern för långt bort; Appproblem. | Verifiera lösenordet; Flytta enheten närmare routern; Starta om appen/enheten. |
9. Specifikationer
| Särdrag | Specifikation |
|---|---|
| Modellnummer | 64274_145198 |
| Kylkapacitet | 9000 BTU / 2270 Watt |
| Avfuktningskapacitet | 24 liter/dag |
| Luftflöde | Upp till 350 m³/h |
| Rekommenderad rumsstorlek | 14-25 m² |
| Bullernivå | 65 dB |
| Kylmedel | R290 (ECO-friendly) |
| Voltage | 240 volt |
| Wattage | 2600 Watt |
| Mått (L x B x H) | 35.5 x 36.5 x 71.3 cm |
| Material | ABS |
| Energieffektivitetsklass | A |

Figure 11: The energy efficiency label for the CREATE SILKAIR CONNECT, indicating an A-class energy rating, 2.6 kW cooling capacity, and a noise level of 65 dB. More details can be found at eprel.ec.europa.eu/qr/1580267.
10. Garanti och support
For warranty information and technical support, please refer to the warranty card included with your product or visit the official CREATE webwebbplatsen. Spara ditt inköpskvitto som köpbevis.
Tillverkare: SKAPA
Kontakta: Refer to CREATE's official support channels.