1. Produkt överview
The Vremi 12000 BTU Portable Air Conditioner with Heat (Model VRM050520N) is a versatile climate control solution designed for rooms up to 350 square feet. This multi-functional unit offers cooling, heating, fan-only operation, and dehumidification modes, providing comfort throughout the year. Its compact design, built-in castors, and integrated handles ensure easy portability between rooms.

Image: The Vremi 12000 BTU Portable Air Conditioner with Heat, a white unit, is shown in a modern living room next to a window with its exhaust hose connected. A sofa and a plant are also visible.
2. Säkerhetsinformation
Please read all safety instructions carefully before operating the unit. Failure to follow these instructions may result in electric shock, fire, or personal injury.
- Placera alltid enheten på en plan, stabil yta.
- Ensure the unit remains in an upright position for at least 4 hours before initial use or after transport.
- Använd inte enheten med en skadad nätsladd eller kontakt.
- Håll barn och husdjur borta från enheten under drift.
- Se till att det finns tillräckligt med utrymme runt enheten för att luftflödet ska fungera korrekt.
- För inte in föremål i luftventilerna.
3. Paketets innehåll
Kontrollera att alla artiklar finns i paketet:
- Bärbar luftkonditioneringsenhet
- Avgasslang
- Window Slider Kit (adjustable panels)
- Slangadaptrar (2)
- Fjärrkontroll
- Dräneringsrör
- Användarmanual
4. Installation och installation
4.1 Initial placering
Place the portable AC unit on a flat, stable surface. For optimal performance, ensure the unit remains in an upright position for at least 4 hours before plugging it in and operating it for the first time. This allows the refrigerant to settle.
4.2 Window Kit Assembly
The adjustable window slider kit is designed for easy installation in various window types (vertical or horizontal sliding windows).
- Measure your window opening.
- Assemble the window kit panels by sliding them together and securing them with the provided wing nuts to match your window's width or height.
- Place the assembled window kit into the window opening and close the window sash against it to create a seal.

Image: A person is shown installing the adjustable window slider kit into a window frame, demonstrating the ease of setup.
4.3 Avgasslanganslutning
The exhaust hose expels hot air from the unit to the outside, which is crucial for effective cooling.
- Screw the round hose adapters onto both ends of the flexible exhaust hose.
- Attach one end of the assembled exhaust hose to the exhaust outlet on the back of the portable AC unit.
- Connect the other end of the exhaust hose to the opening in the installed window kit.
- Ensure all connections are tight to prevent hot air from re-entering the room. The hose can extend up to 60 inches for flexible placement.

Image: A hand is shown connecting the flexible exhaust hose to the back of the portable air conditioner unit, illustrating the hose attachment process.
5. Bruksanvisning
Enheten kan styras med hjälp av kontrollpanelen ovanpå enheten eller den medföljande fjärrkontrollen.
5.1 Kontrollpanel
The control panel features an LED display and touch buttons for various functions:
- Strömknapp: Slår på/av enheten.
- Lägesknapp: Cycles through Cool, Heat, Fan, and Dry (Dehumidify) modes.
- Temperatur upp/ned pilar: Adjusts the desired temperature (range 55-81°F).
- Fläkthastighetsknapp: Väljer hög eller låg fläkthastighet.
- Timerknapp: Ställer in timern för automatisk på/av.
- Sleep-knapp: Aktiverar tyst driftläge.
- Svängknapp: Activates the automatic louver swing for wider air distribution.

Bild: En detaljerad view of the unit's top-mounted control panel with an LED display and various function buttons, alongside the remote control.
5.2 Fjärrkontroll
Fjärrkontrollen ger bekväm åtkomst till alla funktioner på avstånd.
- Alla funktioner som är tillgängliga på kontrollpanelen är också tillgängliga via fjärrkontrollen.
- Sätt i två AAA-batterier (medföljer ej) i fjärrkontrollen.

Image: A close-up of the white remote control, showing buttons for power, mode, fan speed, temperature adjustment, timer, and sleep mode.
5.3 Driftlägen
- Coolt läge: Ger kraftfull kylning för att sänka rumstemperaturen.
- Värmeläge: Offers heating functionality to warm the room.
- Fläktläge: Cirkulerar luft utan kylning eller uppvärmning.
- Avfuktningsläge (torrläge): Avlägsnar överflödig fukt från luften, perfekt för fuktiga förhållanden.
- Viloläge: Operates at a lower fan speed and adjusts the temperature gradually for quiet, comfortable sleep.

Image: Graphic displaying icons for Cool, Fan, Dry, Sleep, and Heat modes, indicating the unit's multi-functional capabilities.
6. Underhåll
Regelbundet underhåll säkerställer optimal prestanda och livslängd för din portabla luftkonditionering.
6.1 Rengöring av luftfilter
The reusable air filter should be cleaned weekly to maintain air quality and unit efficiency.
- Stäng av och koppla ur enheten.
- Lokalisera och ta bort luftfiltret från enhetens baksida.
- Skölj filtret under rinnande vatten tills det är rent.
- Låt filtret lufttorka helt innan du sätter tillbaka det.
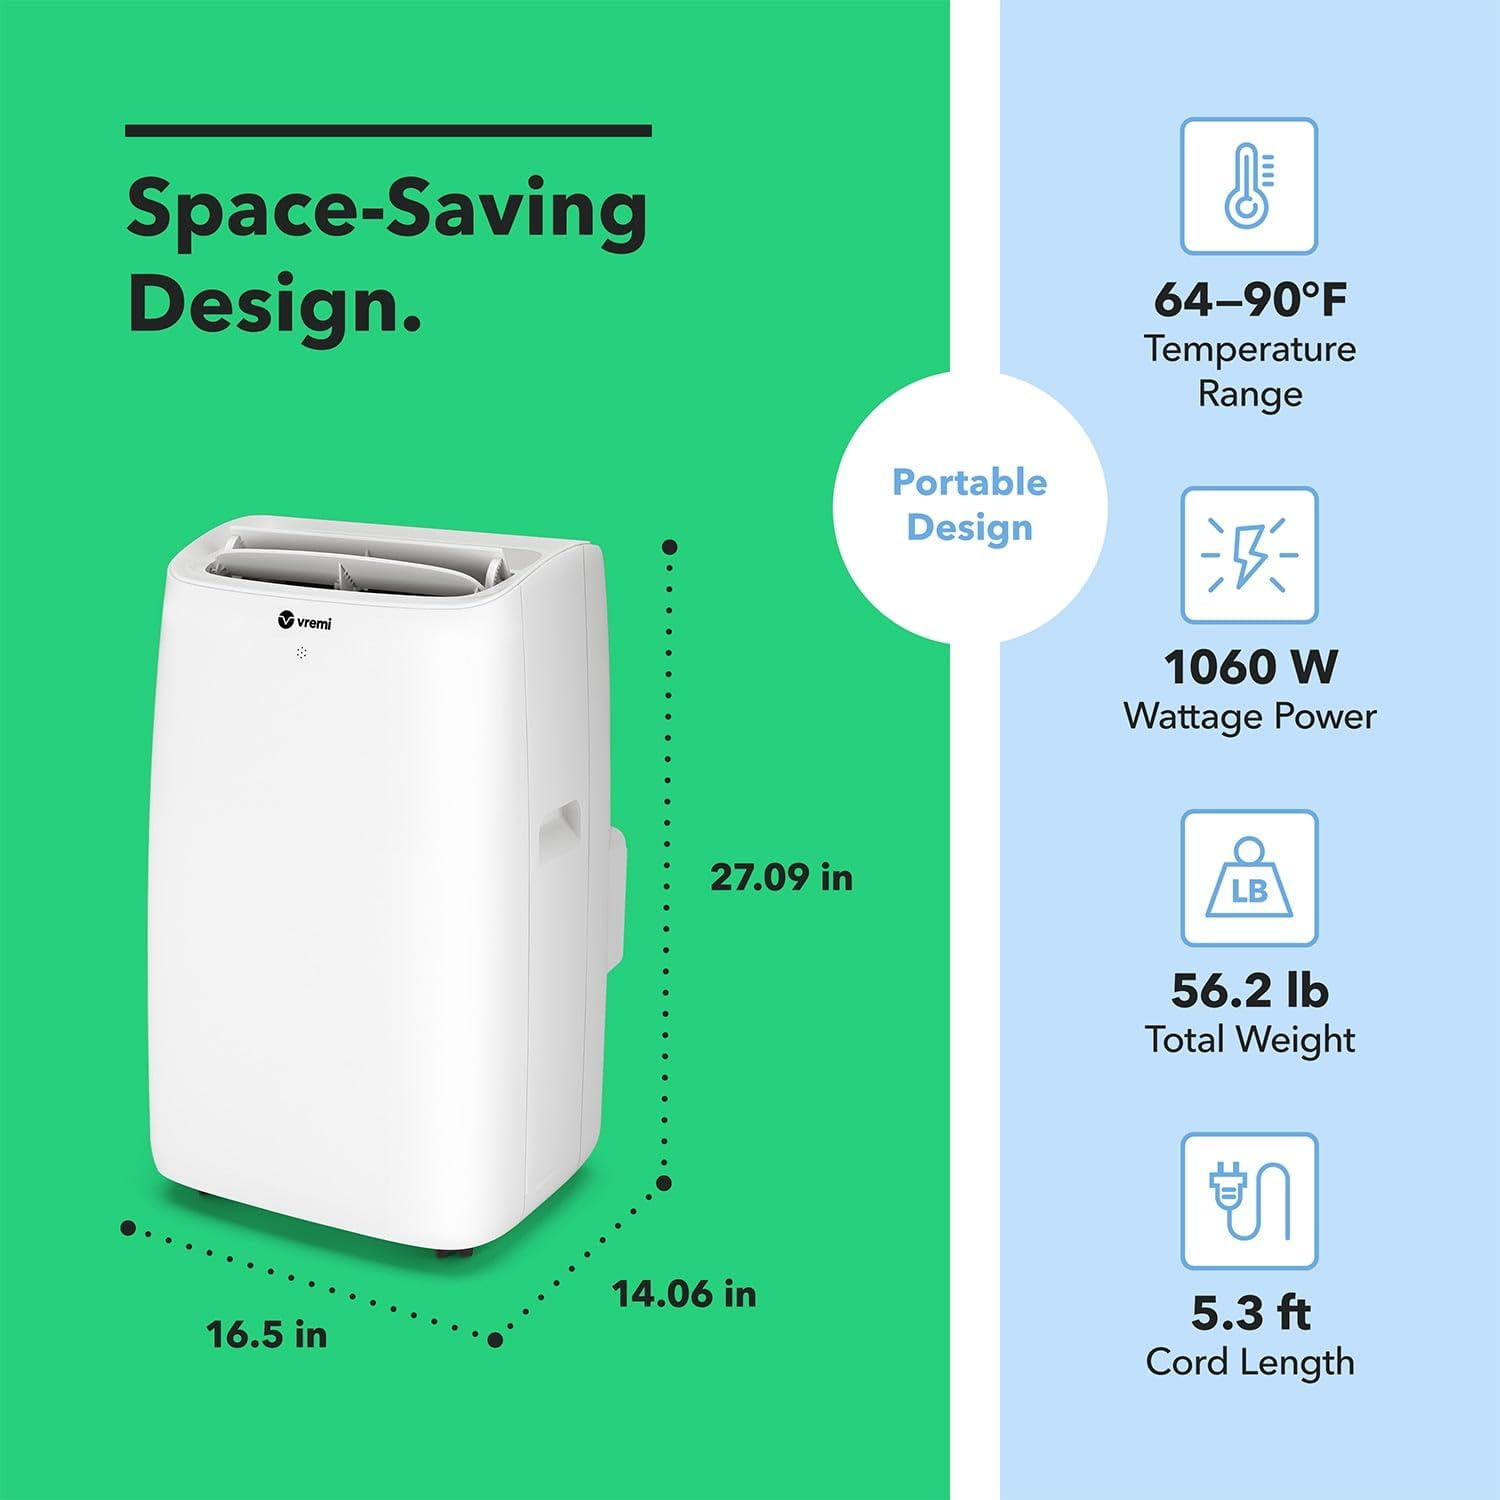
Image: A hand is shown cleaning the removable air filter under a running faucet, emphasizing the 'easy to clean' feature.
6.2 Vattenavlopp
The unit collects moisture during cooling and dehumidifying operations. When the internal water tank is full, the "Water Full" indicator will illuminate, and the unit will stop operating until drained.
- Manuell dränering: Place a shallow pan or bucket under the drainage outlet located at the bottom rear of the unit. Remove the rubber stopper to allow water to drain. Replace the stopper once the tank is empty.
- Kontinuerlig dränering: For continuous dehumidification, attach the provided drainage tube to the drainage outlet and direct the other end to a suitable floor drain or a larger container.
7. Felsökning
Om du stöter på problem, se följande vanliga felsökningssteg:
- Enheten slås inte på: Check if the power cord is securely plugged into a grounded outlet. Ensure the "Water Full" indicator is not lit; if it is, drain the water tank.
- Enheten kyler/värmer inte effektivt: Verify that the desired temperature is set correctly. Check if the air filter is clean. Ensure the exhaust hose is properly installed and sealed to prevent air leakage. Confirm that windows and doors are closed.
- "Water Full" indicator is on: The internal water tank is full. Refer to section 6.2 for drainage instructions.
For further assistance, please contact Vremi customer support.
8. Specifikationer
| Särdrag | Detalj |
|---|---|
| Stämpla | Vremi |
| Modellnamn | VRM050520N |
| Kylkraft | 12000 BTU (ASHRAE) / 8150 BTU (New DOE) |
| Golvyta täckning | Upp till 350 XNUMX kvadratfot |
| Produktens mått | 14.09" D x 16.5" B x 27.09" H |
| Bullernivå | 52 decibel |
| Temperaturområde | 55-81°F |
| Driftlägen | Cool, Heat, Fan, Dehumidify, Sleep |
| Kontrollmetod | Touch, Fjärrkontroll |
| Filtertyp | Pre-Filter (Reusable) |
| Bärbarhet | Built-in Castors and Handles |
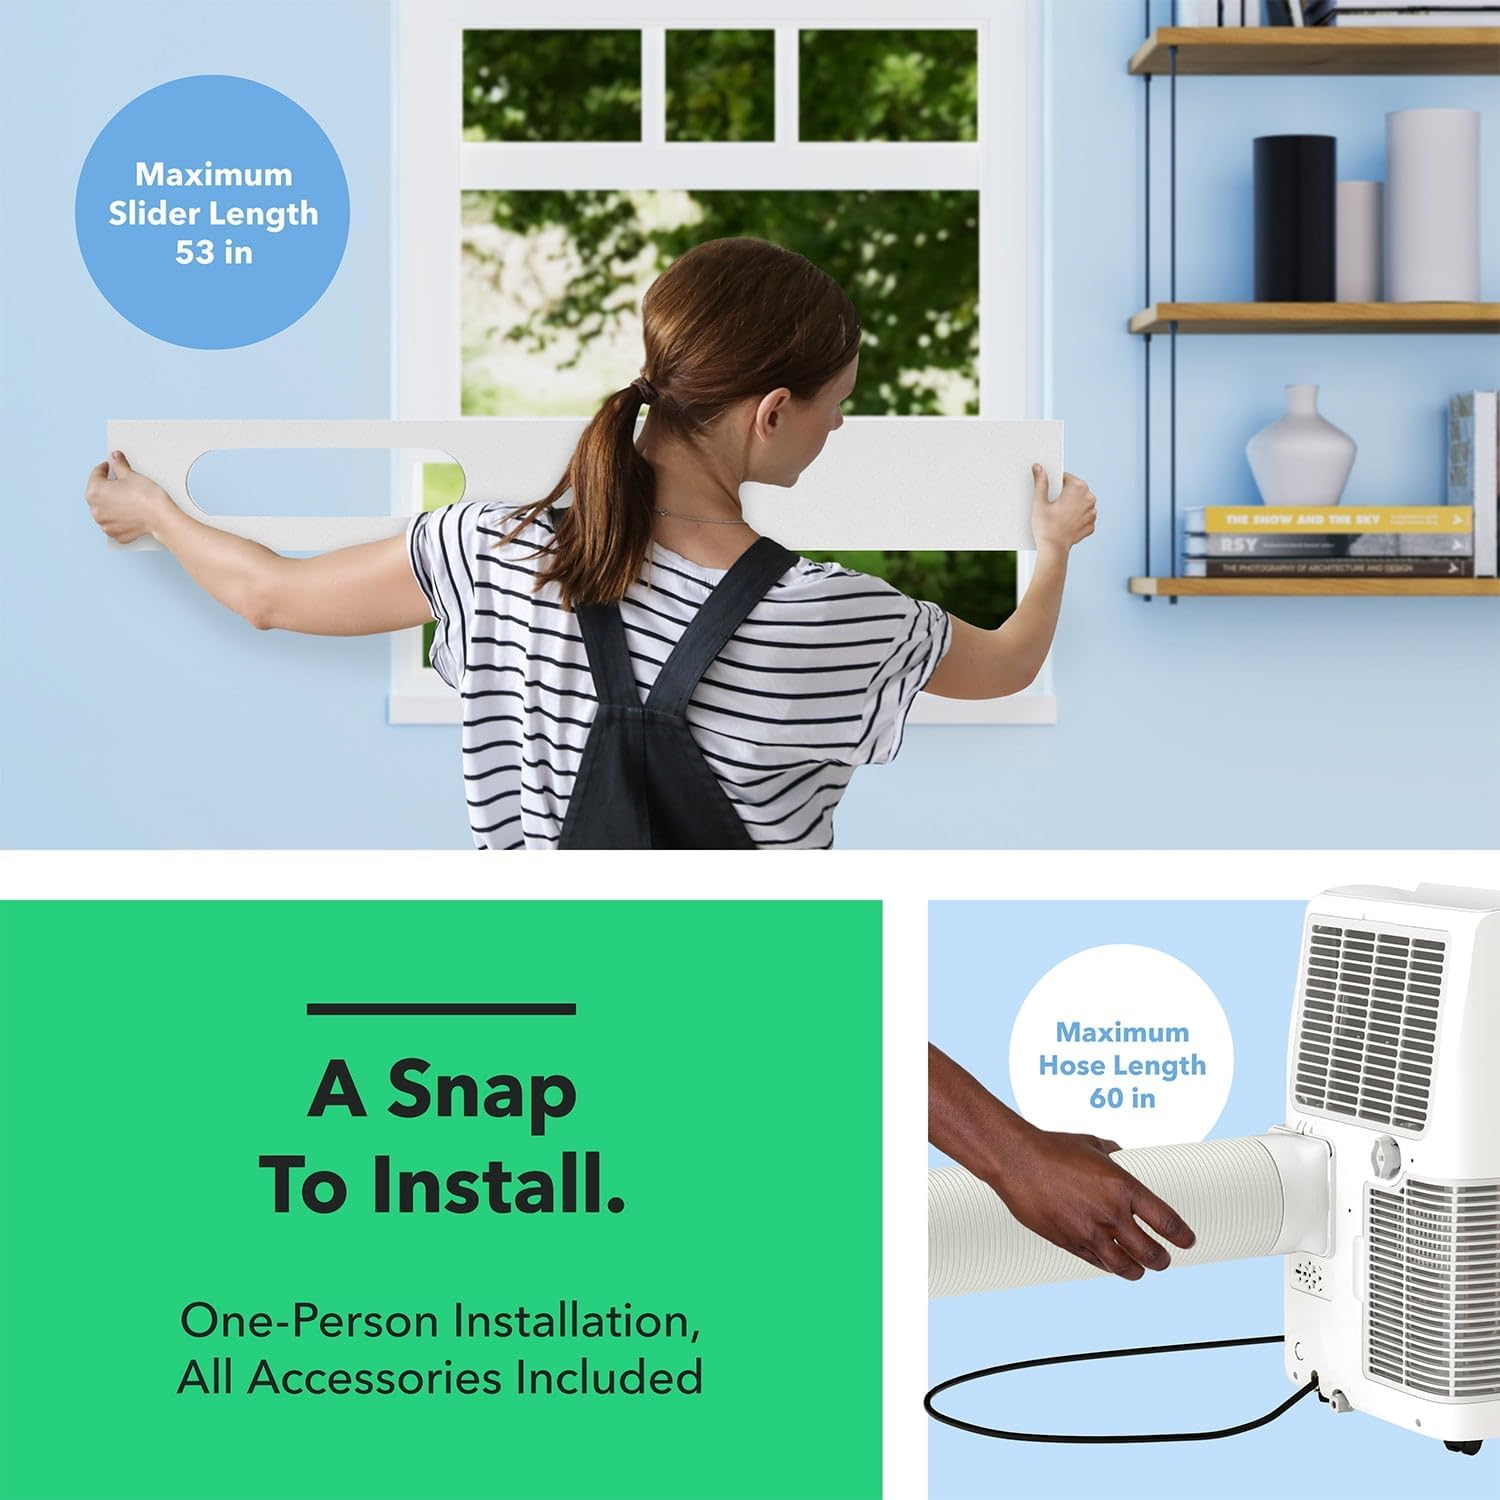
Image: A graphic illustrating the dimensions (depth, width, height) and weight of the portable air conditioner, along with its temperature range and wattage.
9. Garanti och kundsupport
This Vremi product comes with a limited warranty. For detailed warranty information, product registration, or technical support, please refer to the contact information provided in the original packaging or visit the official Vremi webplats.