Deeyaple F-8816
Deeyaple LED digital väckarklocka användarmanual
Modell: F-8816
1. Introduktion
Tack för köpetasing the Deeyaple LED Digital Alarm Clock. This manual provides detailed instructions for setting up, operating, and maintaining your new alarm clock. Please read this manual thoroughly before use to ensure proper functionality and to maximize your user experience. This clock features adjustable brightness, dual alarms, a snooze function, and a clear LED display showing both time and day.
2. Säkerhetsinformation
- Utsätt inte enheten för extrema temperaturer, direkt solljus eller hög luftfuktighet.
- Håll enheten borta från vatten och andra vätskor.
- Use only the provided USB cable for power. An AC adapter is not included.
- Försök inte att ta isär eller reparera enheten själv. Kontakta kundsupport om problem uppstår.
- Förvaras utom räckhåll för barn.
3. Paketets innehåll
- Deeyaple LED Digital Alarm Clock (Model: F-8816)
- USB Power Cable (Note: Power adapter not included)
- Användarmanual (Detta dokument)

Figure 3.1: Back panel and side view of the alarm clock, showing control buttons and USB port.
4. Produkt överview
4.1 Frontdisplay
The front of the clock features a large LED display that shows the time, day of the week, and indicators for Alarm 1 and Alarm 2. The display uses vibrant, multi-colored digits for enhanced readability.

Bild 4.1: Framsidan view of the alarm clock with time and day displayed.
4.2 Top Buttons
- SNOOZE/LIGHT-knapp: Located on the top. Press to activate snooze during an alarm or to adjust display brightness.
4.3 Back Controls
- TIDSINSTÄLLNINGSknapp: Used to enter time setting mode.
- ALARM SET-knapp: Used to enter alarm setting mode.
- UPP (+)-knapp: Increases values during setting or toggles functions.
- NER-knapp (-): Decreases values during setting or toggles functions.
- DC 5V-port: USB power input.
- Återställningsknapp: Small button to reset the clock to factory settings.

Bild 4.2: Bak view of the alarm clock, highlighting the USB power input and control buttons.
5. Inställning
5.1 Strömförsörjning av enheten
- Connect the provided USB power cable to the DC 5V port on the back of the alarm clock.
- Plug the other end of the USB cable into a standard USB power adapter (not included) or a powered USB port (e.g., computer, power bank).
- Displayen tänds, vilket indikerar att klockan är påslagen.

Figure 5.1: The alarm clock is powered via a USB cable, ensuring continuous display.
6. Bruksanvisning
6.1 Ställa in tiden
- Tryck på TIDSINSTÄLLNING button on the back of the clock. The hour digits will start flashing.
- Använd UPP (+) or NED (-) knappar för att justera timmen.
- Trycka TIDSINSTÄLLNING igen för att bekräfta timmen och gå vidare till minutinställning. Minutsiffrorna blinkar.
- Använd UPP (+) or NED (-) knappar för att justera minuterna.
- Trycka TIDSINSTÄLLNING a third time to confirm the minutes and move to 12/24H format selection.
- Använd UPP (+) or NED (-) buttons to select between 12-hour (with AM/PM indicator) or 24-hour format.
- Trycka TIDSINSTÄLLNING one last time to save the settings and exit time setting mode.
6.2 Ställa in larm (dubbla larm)
Klockan stöder två oberoende alarm (Alarm 1 och Alarm 2).
- Tryck på LARMINSTÄLLNING button. The Alarm 1 hour digits will start flashing, and the Alarm 1 icon will appear.
- Använd UPP (+) or NED (-) buttons to adjust the Alarm 1 hour.
- Trycka LARMINSTÄLLNING again to confirm the hour and move to Alarm 1 minute setting. The minute digits will flash.
- Använd UPP (+) or NED (-) buttons to adjust the Alarm 1 minutes.
- Trycka LARMINSTÄLLNING a third time to confirm minutes and move to Alarm 1 day setting.
- Använd UPP (+) or NED (-) buttons to select the alarm days:
- 1-1: Endagslarm
- 1-5: Måndag till fredag
- 1-6: Måndag till lördag
- 1-7: Monday to Sunday (Every day)
- 6-7: Saturday to Sunday (Weekend)
- Trycka LARMINSTÄLLNING again to confirm Alarm 1 settings and proceed to Alarm 2 setting. Repeat steps 2-6 for Alarm 2.
- Efter att du har ställt in larm 2, tryck på LARMINSTÄLLNING one last time to save all alarm settings and exit.

Figure 6.1: Alarm days setting options for customized wake-up schedules.
6.3 Snooze -funktion
När ett larm ljuder, tryck på den stora knappen SNOOZE / LIGHT button on the top of the clock. The alarm will pause for 5 minutes and then sound again. You can repeat the snooze cycle multiple times.

Figure 6.2: Activating the snooze function by touching the top button for an additional 5 minutes of rest.
6.4 Justera skärmens ljusstyrka
The clock has 3 levels of brightness (Bright, Medium, Low) and an option to turn off the display.
- Tryck på SNOOZE / LIGHT button on the top of the clock (when no alarm is sounding) to cycle through the brightness levels: Bright > Medium > Low > Off > Bright.
- Select the brightness level that best suits your environment and preference.
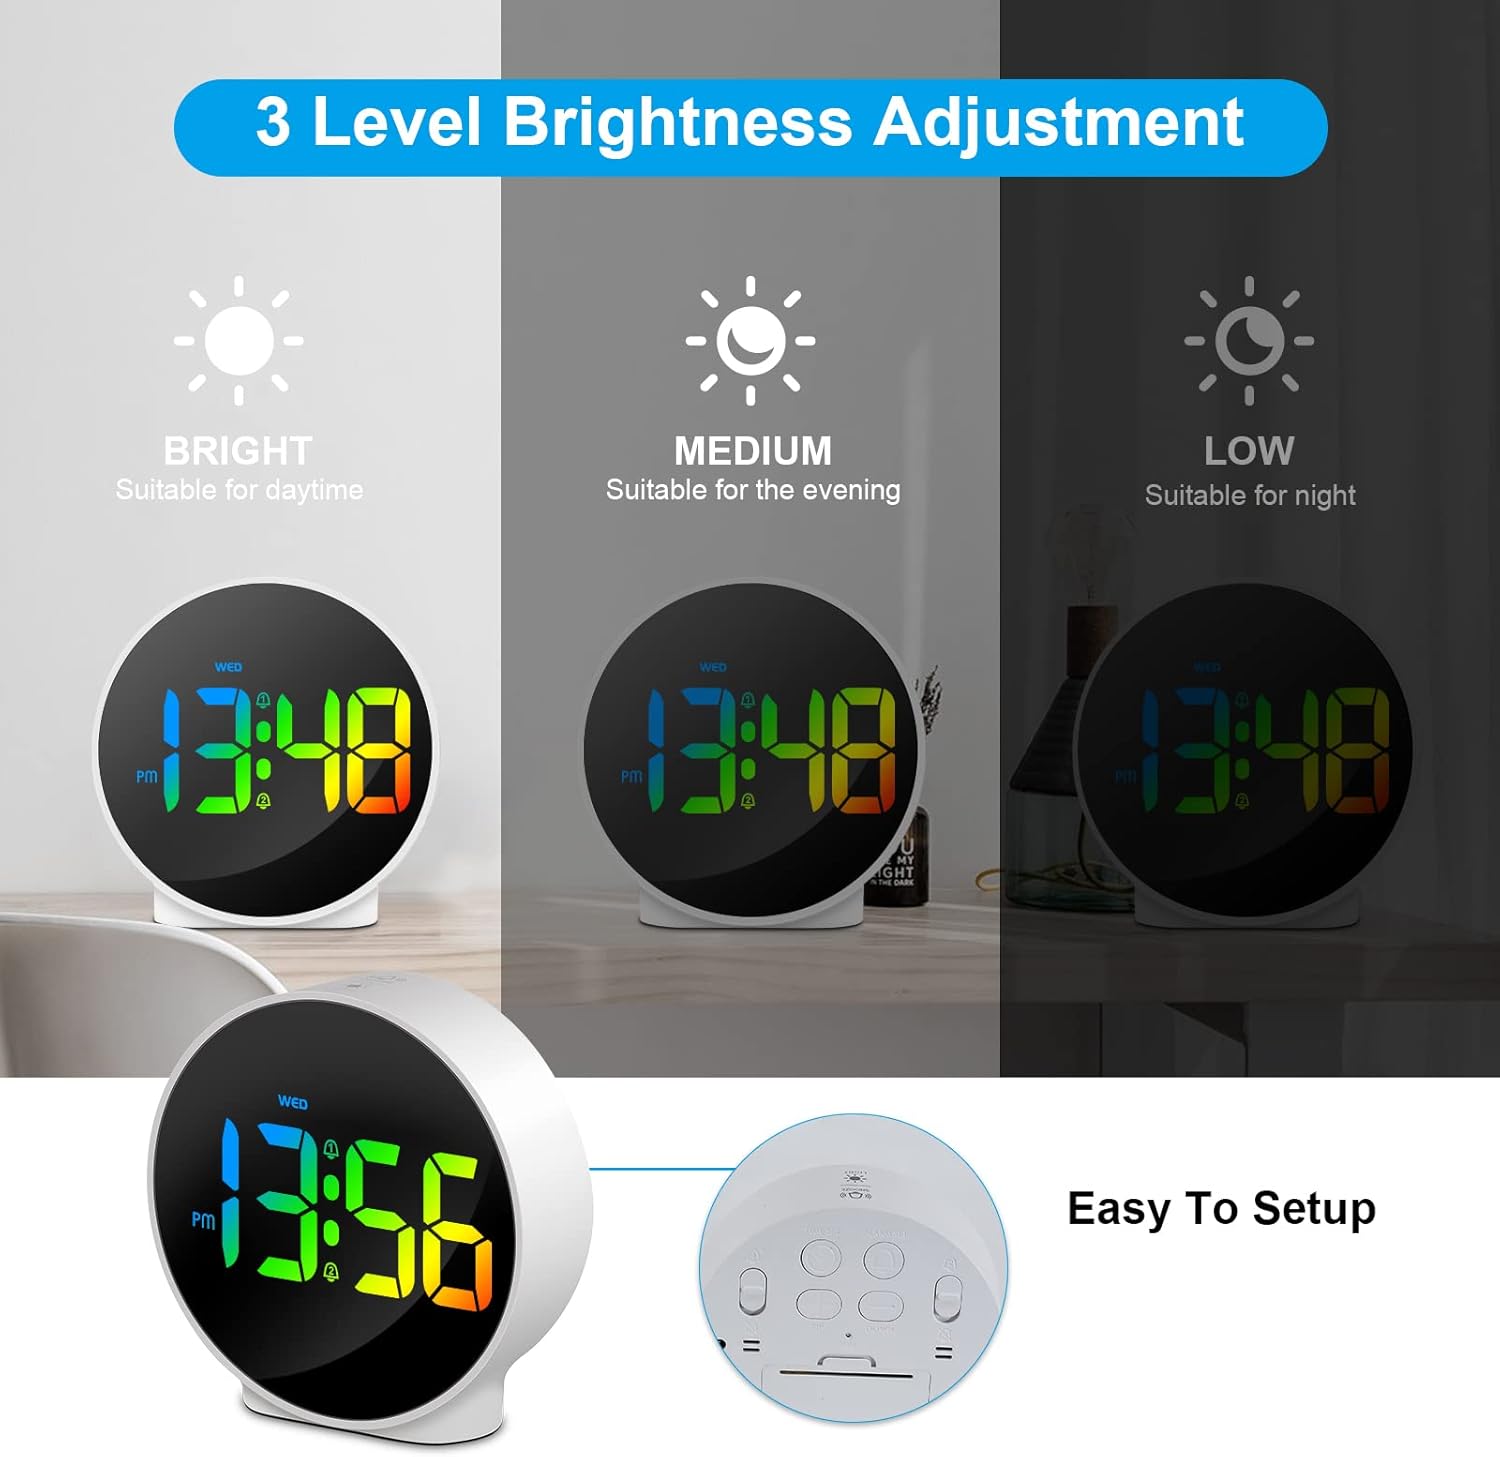
Figure 6.3: Three adjustable brightness levels for optimal viewi olika ljusförhållanden.
6.5 Week and Time Display
The clock simultaneously displays the current time and the day of the week on the same screen, eliminating the need to switch displays.

Figure 6.4: The clock displays both the time and the day of the week on a single screen for convenience.
7. Underhåll
- Rengöring: Använd en mjuk, torr trasa för att rengöra klockans yta. Använd inte slipande rengöringsmedel eller lösningsmedel.
- Lagring: Om klockan förvaras under en längre tid, koppla bort den från strömmen och förvara den på en sval, torr plats.
8. Felsökning
| Problem | Möjlig orsak | Lösning |
|---|---|---|
| Displayen är avstängd eller svag. | Not powered, brightness set to off/low. | Ensure USB cable is securely connected to a power source. Press SNOOZE/LIGHT button to adjust brightness. |
| Larmet ljuder inte. | Alarm not set, alarm volume too low (not applicable for this model), incorrect alarm days. | Verify alarm time and ensure the alarm icon is displayed. Check alarm day settings. |
| Tiden är felaktig. | Tiden är felinställd, strömavbrott. | Re-set the time following Section 6.1. Ensure continuous power supply. |
| Knapparna svarar inte. | Tillfälligt programvarufel. | Unplug the USB cable, wait 10 seconds, then plug it back in. If issue persists, use the RESET button on the back (requires a thin object like a paperclip). |
9. Specifikationer
- Stämpla: Deeyaple
- Modellnummer: F-8816
- Färg: White shell with multi-color display
- Mått (L x B x H): 10 x 3.81 x 10 cm (3.94 x 1.5 x 3.94 tum)
- Vikt: 180 gram (0.4 lbs)
- Drag: Dual Alarm, Snooze, Adjustable Brightness (3 levels + off), 12/24H Display, Week Display, Corded Electric
- Strömkälla: USB Cable (DC 5V)
- Visningstyp: Digital LED
- Material: Akrylnitril Butadien Styren (ABS)

Figure 9.1: Dimensions of the Deeyaple LED Digital Alarm Clock.
10. Garanti och support
Deeyaple products are designed for quality and reliability. For any questions, technical support, or warranty claims, please contact the seller or manufacturer directly through your purchase platform. Please retain your proof of purchase for warranty purposes.
Ask a question about this manual
Ask about setup, troubleshooting, compatibility, parts, safety, or missing instructions. Manuals+ will review the question and use this page’s manual context to help answer it.