
1. Introduktion
The DKARDU Mini Logic Analyzer is an open-source hardware and software logic analyzer designed for efficient debugging and protocol analysis. It features a compact design, 8 channels, and supports a maximum sampling rate of 24MHz, along with over 100 types of protocol analysis. This device significantly enhances efficiency in scenarios involving complex systems with multiple components, timing analysis, and performance analysis.
This manual provides detailed instructions for setting up, operating, and maintaining your Mini Logic Analyzer.

Image 1.1: The DKARDU Mini Logic Analyzer, including the main unit, USB-C cable, 10 female-to-female Dupont cables, and 10 test hook clips.
2. Paketets innehåll
Kontrollera att alla artiklar som anges nedan ingår i ditt paket:
- 1 x Mini Logic Analyzer Unit
- 1 x USB till Type-C-kabel
- 10 x Female-to-Female Dupont Cables
- 10 x Test Hook Clips
3. Specifikationer
| Särdrag | Specifikation |
|---|---|
| Operativsystemkompatibilitet | Windows, Linux, Mac, Android |
| Programvarumiljö | PulsView (Sigrok open-source community) |
| Sampling Channels | 8 kanaler |
| Maximal Sampling Rate | 24 MHz |
| Logic Level (Low) | [-0.5V, 0.8V] |
| Logic Level (High) | [2V, 5.25V] |
| Ingång Voltage Räckvidd | [-0.5V, 5.25V] |
| Mått | Approximately 3.9cm x 2.0cm (1.54in x 0.79in) |
| Vikt | 50 g |
| Anslutningstyp | USB typ-C |

Bild 3.1: Fram och bak views of the Mini Logic Analyzer, showing the DLA V2.1 marking on the back and channel labels (CH0-CH7, GND) on the front.

Image 3.2: Physical dimensions of the Mini Logic Analyzer, measuring approximately 30mm (1.18in) in length and 19mm (0.74in) in width, shown next to a coin for scale.
4. Inställning
4.1. Software Installation (PulseView)
The Mini Logic Analyzer uses PulseView software, which is part of the open-source Sigrok project. Follow these steps to install PulseView:
- Download PulseView: Obtain the appropriate installation package for your operating system (Windows, Linux, Mac, Android) from the official Sigrok website or the provided GitHub link: https://github.com/wuxx/nanoDLA/tree/master/software.
- Kör installationsprogrammet: Double-click the downloaded installation package and follow the on-screen instructions to complete the installation.

Image 4.1: Screenshot showing the PulseView software download options for various operating systems (Linux, Mac, Android, Windows).
4.2. Installation av drivrutiner
After installing PulseView, you need to install the necessary drivers for the logic analyzer to be recognized by your computer. This process typically involves using the Zadig utility for Windows users.
- Anslut enheten: Plug the nanoDLA (Mini Logic Analyzer) into a PC USB port using the provided Type-C cable.
- Första erkännandet: Your PC's Device Manager may initially recognize the nanoDLA as an 'other device' or an unknown device.
- Launch Zadig: Leta efter and open the Zadig utility on your PC. If you don't have it, download it from the Sigrok website or a reliable source.
- Välj enhet: In Zadig, go to 'Options' and toggle on 'List All Devices'. From the dropdown menu, select the device named "fx2lafw" (or similar, look for USB ID 1D50:608C).
- Installera drivrutin: Ensure "WinUSB" is selected in the driver field, then click the "Install Driver" button.

Image 4.2: Screenshot illustrating the Zadig utility interface, showing the device list and the option to select 'other devices' for driver installation.
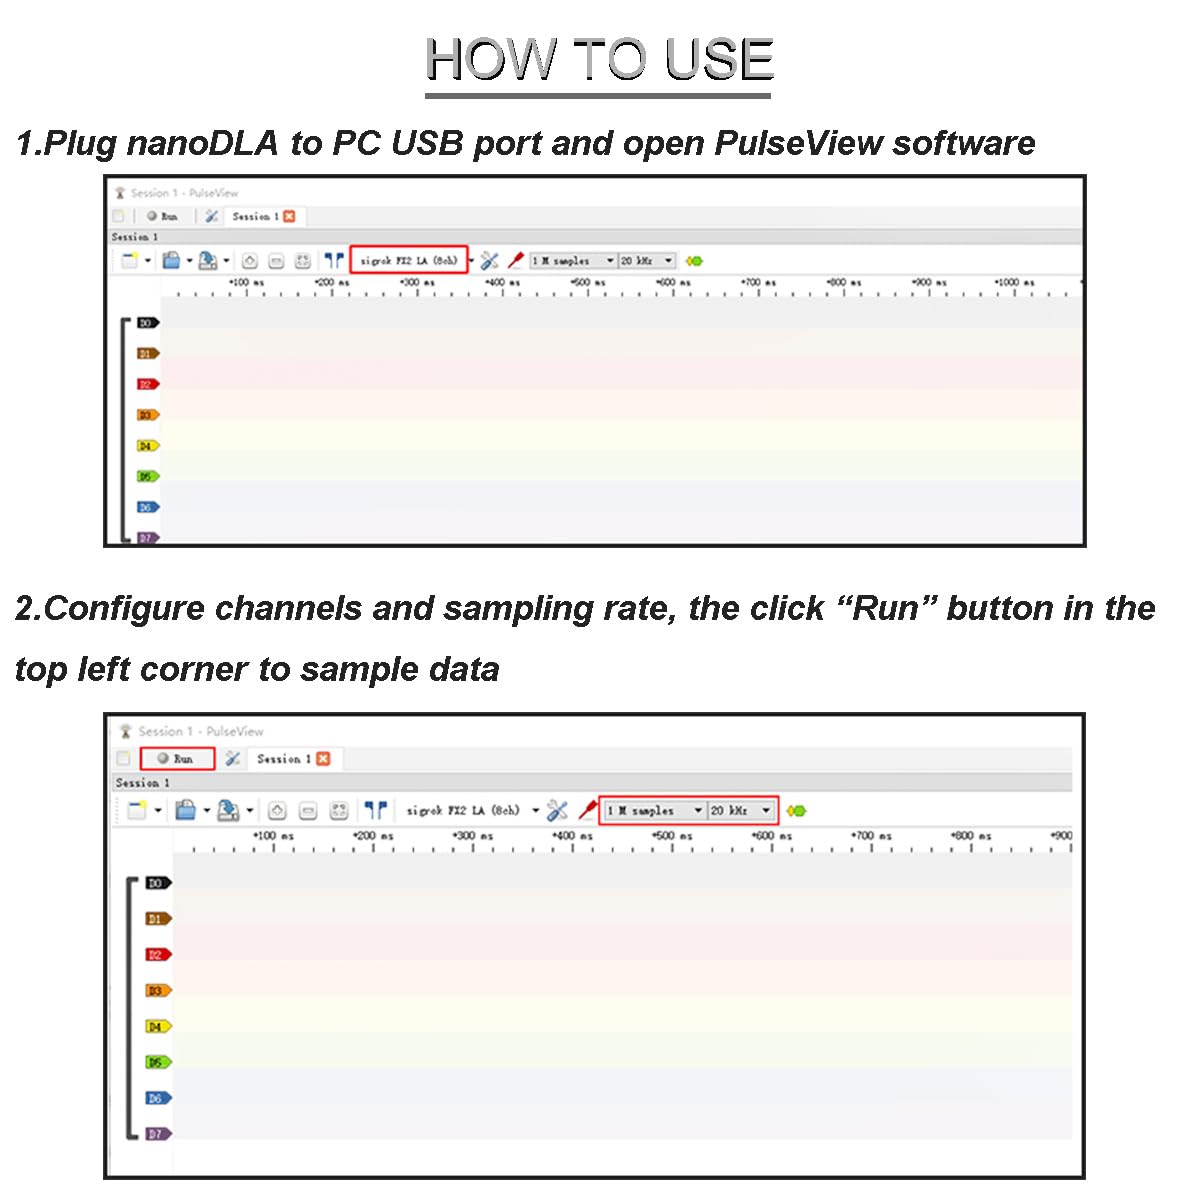
Image 4.3: Screenshot of the Zadig utility, highlighting the selection of "fx2lafw" (USB ID 1D50:608C) and the "WinUSB" driver for installation.
After successful driver installation, the nanoDLA should be recognized as a "Universal Serial Bus Device" in your Device Manager.
5. Bruksanvisning
Once the software and drivers are installed, you can begin using your Mini Logic Analyzer with PulseView.
- Connect and Launch: Plug the nanoDLA into your PC's USB port and open the PulseView programvara.
- Configure Channels and Sampling rate: In PulseView, configure the desired channels (CH0-CH7) and set the sampling rate. The maximum sampling rate is 24MHz.
- Starta Samplånga: Click the "Run" button (usually located in the top-left corner) to begin sampling data.

Image 5.1: Screenshot of the PulseView software interface, demonstrating how to configure channels and sampling rate, and initiate data samplånga.
- Decode Signals: After signals are sampled, you can use the built-in decoders to analyze them. For example, to decode UART sampled data:
- Click the decoder menu.
- Select the UART protocol.
- Configure UART parameters such as channels, baud rate, data bits, and parity type.
Important Note on Sampling rate: While the logic analyzer supports up to 24MHz sampling, the actual achievable rate can vary depending on your PC's operating system, USB controller, USB bus status, and USB drivers. For optimal signal reconstruction, a sampling rate at least 5 times (and ideally 10 times) the original signal frequency is recommended. In practice, Linux systems often achieve 24MHz, while most Windows systems (Win7/Win10) typically achieve 16MHz.
6. Underhåll
To ensure the longevity and optimal performance of your DKARDU Mini Logic Analyzer, follow these general maintenance guidelines:
- Lagring: Store the device in a dry, dust-free environment away from extreme temperatures.
- Rengöring: Använd en mjuk, torr trasa för att rengöra enheten. Undvik att använda flytande rengöringsmedel eller lösningsmedel.
- Hantering: Handle the device and its accessories with care to prevent physical damage. Avoid bending or stressing the connectors.
- Kabelvård: Inspect cables regularly for any signs of wear or damage. Replace damaged cables immediately.
7. Felsökning
If you encounter issues with your Mini Logic Analyzer, consider the following troubleshooting steps:
- Enhet som inte känns igen:
- Ensure the USB cable is securely connected to both the logic analyzer and your computer.
- Verify that the drivers are correctly installed using the Zadig utility as described in Section 4.2.
- Prova att ansluta till en annan USB -port på din dator.
- Starta om datorn.
- No Signal or Incorrect Readings:
- Check the connections of the Dupont cables and test clips to your circuit. Ensure they are making good contact.
- Verify that the correct channels are selected and configured in PulseView.
- Justera sampling rate. If the signal frequency is too high for the chosen sampling rate, the readings may be inaccurate. Remember the 5x-10x rule mentioned in Section 5.
- Ensure the logic levels of your circuit are within the input voltage range of the logic analyzer ([-0.5V, 5.25V]).
- Software Issues (PulseView):
- Ensure you are using the latest version of PulseView.
- Consult the PulseView documentation or community forums for specific software-related issues.
8. Garanti och support
8.1. Garantiinformation
Specific warranty details for this product may vary. Please refer to the purchase documentation or contact your retailer for information regarding warranty coverage.
8.2. Teknisk support
For technical assistance, software updates, or additional documentation, please refer to the following resources:
- User Manual & Documentation: https://github.com/wuxx/nanoDLA/blob/master/README.md
- Programnedladdningar: https://github.com/wuxx/nanoDLA/tree/master/software
- Sigrok Project (PulseView): For general PulseView support and community resources, visit the official Sigrok webplats.
If you require further assistance, please contact DKARDU customer support through your purchase platform.