FERIETELF T6-Black
FERIETELF T6 Drönare Användarmanual
Model: T6-Black
1. Introduktion
Thank you for choosing the FERIETELF T6 Drone. This manual provides essential information for the safe operation, setup, and maintenance of your drone. Please read this manual thoroughly before operating the drone to ensure proper use and to maximize your flying experience.
2. Vad finns i lådan
Packa försiktigt upp alla föremål och kontrollera mot listan nedan. Om några föremål saknas eller är skadade, vänligen kontakta kundsupport.

Image: The FERIETELF T6 drone, remote controller, two modular batteries, four propeller guards, and spare propellers.
- FERIETELF T6 Drone (x1)
- Fjärrkontroll (x1)
- Modulära batterier (x2)
- Propeller Guards (x4)
- Reservpropellrar (x4)
- USB-laddningskabel (x1)
- Skruvmejsel (x1)
- Användarmanual (x1)
3. Produkt överview
The FERIETELF T6 drone is designed for both beginners and experienced users, featuring a 1080P HD camera, various intelligent flight modes, and a user-friendly control system.
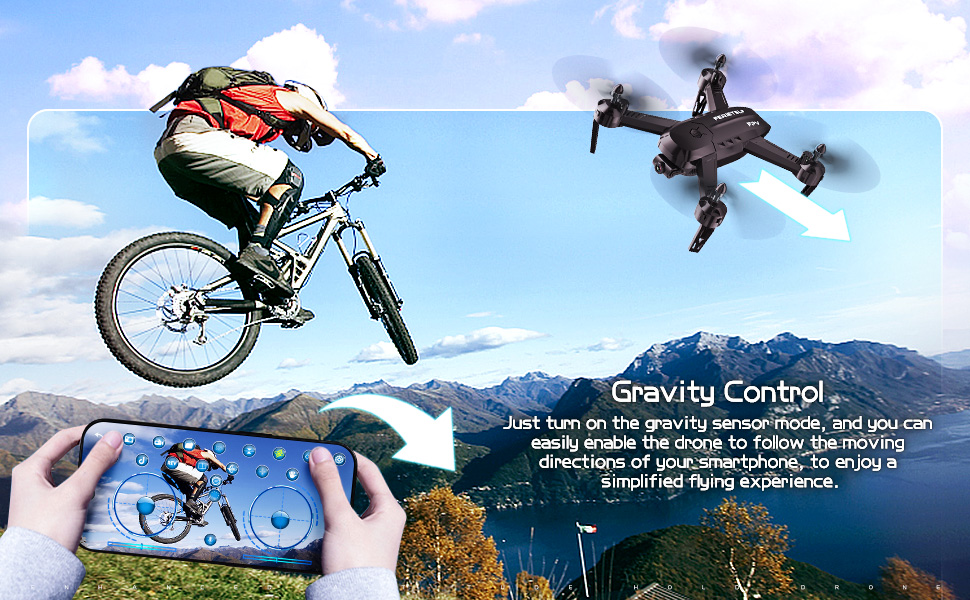
Image: The drone demonstrating its Altitude Hold capability, maintaining a stable height for photography.
Nyckelfunktioner:
- 1080P HD WiFi Camera: Capture high-quality photos and videos with gesture control.
- Höjdhåll: Maintains a stable flight height for easy control and clear aerial shots.
- Flera flyglägen: Includes Headless Mode, Line Drawing Flight, 360° Flip, and Gravity Control.
- Smart röststyrning: Command the drone with simple voice commands.
- Modular Batteries: Two batteries provide extended flight time.
- En viktig start/landning: Förenklar driften för nybörjare.
4. Inställning
4.1 Batteriinstallation
Install the modular battery into the drone and the AAA batteries (not included) into the remote controller.

Image: Diagram showing the correct method for inserting and removing the drone battery, emphasizing the press-push mechanism for child protection.
Drone Batteri: To insert or remove the modular battery, you need to press your thumb firmly on the snap part at the end of the battery module and push it into the battery compartment at the same time. Pushing directly without pressing the snap may damage the battery slot.
4.2 Installation av propellerskydd
Fäst propellerskydden på drönarens armar för att skydda propellrarna under flygning, särskilt för nybörjare.
4.3 Installation av fjärrkontroll
Insert 3 AAA batteries (not included) into the remote controller. Ensure correct polarity. The remote controller will automatically pair with the drone upon power-on.
4.4 Appinstallation och anslutning
Download the dedicated drone app from your smartphone's app store. Power on the drone, connect your smartphone to the drone's Wi-Fi network, and then open the app to establish a connection for FPV viewing and advanced controls.
5. Bruksanvisning
5.1 Kalibrering
Before each flight, place the drone on a smooth, horizontal surface and perform calibration as per the app or remote controller instructions. This ensures stable flight.

Image: Visual representation of placing the drone on a smooth, horizontal surface for calibration before flight.
5.2 Start och landning
- En viktig start: Press the dedicated One Key Take-off button on the remote controller or in the app. The drone will automatically ascend to a stable height.
- En nyckellandning: Press the dedicated One Key Landing button. The drone will slowly descend and land automatically.
- Manual Take-off/Landing: Use the throttle stick to manually control ascent and descent.
5.3 Flyglägen
- Höjdhåll: The drone automatically maintains its current altitude, making it easier to control and capture stable photos/videos.
- Huvudlöst läge: In this mode, the drone's orientation is relative to the pilot, regardless of the drone's actual front direction. This simplifies control for beginners.
- Line Drawing Flight: Draw a flight path on your smartphone screen within the app, and the drone will automatically follow the designated route.
- 360° vändning: Execute impressive aerial stunts with a single button press. Ensure sufficient altitude before performing flips.
- Smart röststyrning: Use predefined voice commands (e.g., "Forward," "Backward," "Take Off," "Landing") to control the drone.
- Tyngdkraftskontroll: Enable the gravity sensor mode on your smartphone to control the drone's movement by tilting your phone.

Image: A user drawing a flight path on a smartphone screen, which the drone then follows over a mountainous landscape.

Image: People interacting with the drone using voice commands, with speech bubbles indicating commands like "Forward," "Backward," "Landing," and "Take Off."
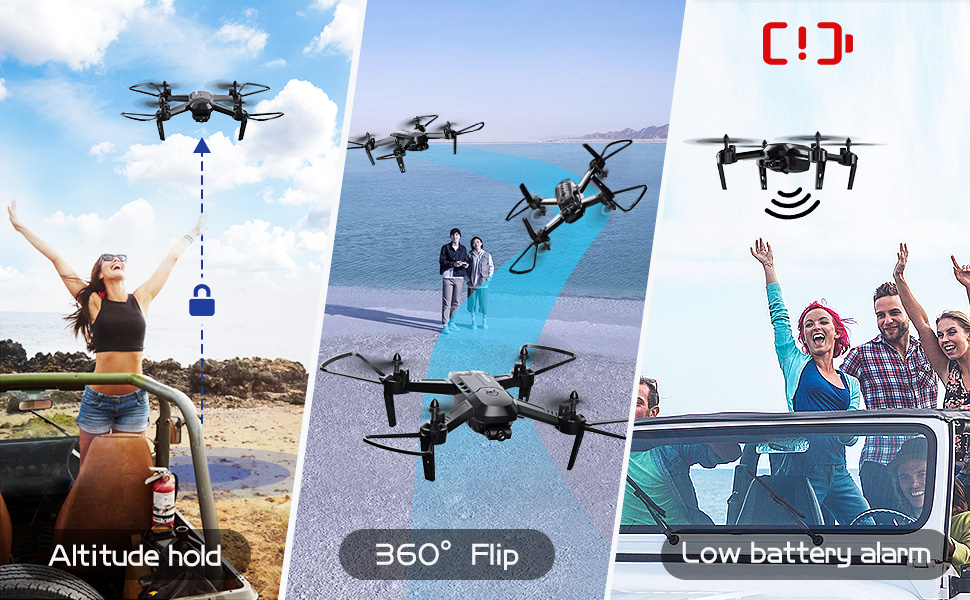
Image: A user controlling the drone by tilting a smartphone, demonstrating the gravity control feature.
5.4 Kameradrift
The drone is equipped with a 1080P HD WiFi camera for real-time FPV (First Person View) and recording.

Image: Close-up of the drone's 1080P HD WiFi camera, highlighting its lens components and showing examples of gesture control for taking photos and videos.
- Live-FPV: View the drone's camera feed directly on your smartphone via the app.
- Foto-/videoinspelning: Use the dedicated buttons on the remote controller or within the app to start/stop recording or take photos.
- Gestkontroll: Gör specifika handgester framför kameran för att utlösa foto- eller videoinspelning. Se appen för specifika gester.
6. Underhåll
6.1 Batterivård
Proper battery care extends the life of your drone batteries:
- Avoid charging the battery for too long.
- Replace the battery when it shows signs of swelling or damage.
- Ensure the battery is cool before charging.
- When idle, avoid direct sunlight exposure for the battery.
- Always use the original charging cable. Other cables may damage the battery's internal structure.
6.2 Rengöring
Regularly clean your drone to ensure optimal performance:
- Använd en mjuk, torr trasa för att torka av drönarens kropp.
- Gently remove any dust or debris from the propellers and motors.
- Ensure the camera lens is clean for clear image capture.
7. Felsökning
If you encounter issues with your FERIETELF T6 drone, refer to the following common problems and solutions:
Image: A diagram illustrating key precautions for drone use, including calibration, propeller guard installation, and battery care tips.
- Drönaren svarar inte: Ensure both the drone and remote controller are fully charged and powered on. Re-pair the drone and controller if necessary.
- Instabil flygning: Perform a full calibration on a flat surface. Check for damaged propellers and replace if needed.
- Kameran fungerar inte: Ensure the drone is properly connected to the app via Wi-Fi. Check app permissions for camera access.
- Kort flygtid: Ensure batteries are fully charged. Old or damaged batteries may have reduced capacity and should be replaced.
- Drönardrifter: Perform fine-tuning adjustments using the trim buttons on the remote controller or the calibration function in the app.
- Ingen FPV-matning: Verify Wi-Fi connection between your smartphone and the drone. Ensure the app is updated to the latest version.
8. Specifikationer
| Särdrag | Detalj |
|---|---|
| Stämpla | FERIETELF |
| Modellnummer | T6-Svart |
| Produktens mått | 22 x 11 x 34 cm |
| Objektets vikt | 600 g |
| Kontrolltyp | Fjärrkontroll, Appkontroll |
| Videoinspelningsformat | MP4 |
| Åldersintervall (beskrivning) | Barn, vuxen |
9. Garanti och support
For warranty information and customer support, please refer to the product packaging or contact FERIETELF customer service directly. Keep your purchase receipt as proof of purchase.
Ask a question about this manual
Ask about setup, troubleshooting, compatibility, parts, safety, or missing instructions. Manuals+ will review the question and use this page’s manual context to help answer it.