
1. Viktiga säkerhetsinstruktioner
Always follow basic safety precautions when using this product to reduce the risk of fire, electric shock, and injury to persons. Read all instructions carefully before use and retain them for future reference. Do not expose this appliance to rain or moisture. Do not use this apparatus near water. Clean only with dry cloth. Do not block any ventilation openings. Install in accordance with the manufacturer's instructions. Do not install near any heat sources such as radiators, heat registers, stoves, or other apparatus (including amplyftare) som producerar värme. Använd endast tillbehör/tillbehör som specificerats av tillverkaren.
2. Vad finns i lådan
Carefully unpack all components and ensure all items are present before discarding packaging materials.
- Skivspelare
- Tallrik
- Skivbordsmatta
- Dammskydd
- Nätkabel
- Balansvikt
- EP-skivaadapter
- Toppskåpa med pickup (Audio-Technica AT-VM95C)
- PHONO Cable
- PHONO jordkabel

Uppackningsprocess
This video demonstrates the unboxing process for the Technics SL-50C / 40C Series turntables. It shows how to carefully remove cushioning materials, the dust cover, and the turntable unit from the packaging. The turntable mat is typically packaged inside the dust cover.
3. Inställning
3.1 Placering
Place the turntable on a level and stable surface to ensure optimal performance and prevent vibrations from affecting playback quality. The turntable features vibration-resistant feet that can be adjusted to level the unit on uneven surfaces.

3.2 Platter and Mat Installation
Gently place the aluminum platter onto the turntable spindle. Ensure it sits securely. Then, place the turntable mat on top of the platter.

3.3 Tonearm and Cartridge Assembly
- Fäst balansvikten på baksidan av tonearmen.
- Carefully attach the included Audio-Technica AT-VM95C cartridge to the head shell.
- Remove the stylus cover from the cartridge.
- Släpp tonarmen clamp and ensure the tonearm is level.
- Balance the tonearm by adjusting the balance weight until the tonearm floats horizontally.
- Set the numbered ring on the balance weight to zero.
- Turn the entire balance weight to match the recommended stylus pressure for the AT-VM95C cartridge (2g for SL-40CBT).
- Set the anti-skating control to match the stylus pressure setting.


3.4 Strömanslutning
Connect the supplied AC power supply cord to the 'AC IN' terminal on the rear of the turntable and then to a wall outlet.
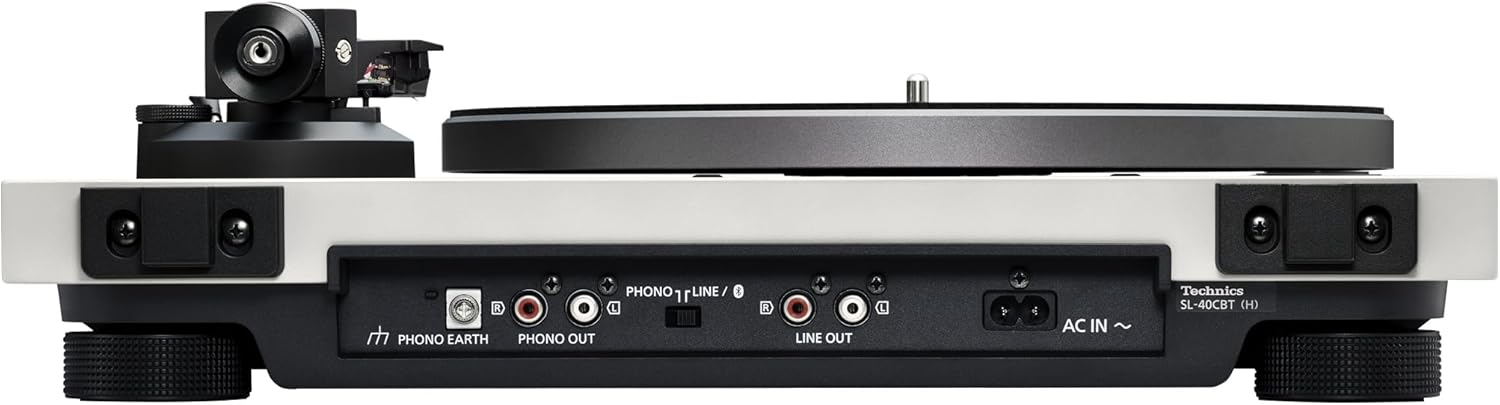
3.5 Ljudanslutningar
The SL-40CBT offers multiple ways to connect to your audio system:
1. LINE OUT (Using Built-in Phono Preamp)
Om din amplifier or active speakers do not have a dedicated PHONO input, use the turntable's built-in phono preamp. Set the 'PHONO T LINE / &#'x24; ' switch on the rear panel to 'LINE'. Connect the RCA stereo cable from the 'LINE OUT' terminals on the turntable to an auxiliary input (e.g., AUX IN, LINE IN) on your amplifier eller aktiva högtalare.
This video segment demonstrates connecting the turntable using the LINE OUT option to an amplifier and speakers, or directly to active speakers. Ensure the switch is set to LINE.
2. PHONO OUT (Using External Phono Preamp)
If you prefer to use an external phono preamp, set the 'PHONO T LINE / &#'x24; ' switch on the rear panel to 'PHONO'. Connect the RCA stereo cable from the 'PHONO OUT' terminals on the turntable to the input of your external phono preamp. Then, connect the output of the external phono preamp to an auxiliary input on your amplifier or active speakers. Connect the PHONO EARTH lead from the turntable to the ground terminal on your external phono preamp or ampluftfuktare för att minska brus.
This video segment illustrates connecting the turntable using the PHONO OUT option to an external phono preamp and then to an amplifier or active speakers. Ensure the switch is set to PHONO.
3. Bluetooth®-anslutning
The SL-40CBT model supports Bluetooth for wireless connection to compatible speakers or headphones. Set the 'PHONO T LINE / &#'x24; ' switch on the rear panel to '&#'x24; '. The turntable supports Qualcomm® aptX™ Adaptive and SBC codecs.
This video segment details how to connect the SL-40CBT turntable wirelessly via Bluetooth to speakers or headphones. Press the Bluetooth button on the control panel to initiate pairing.
4. Användning av skivspelaren
4.1 Ström på/av
Press the power button (&#'x24; /I) on the control panel to turn the turntable on or off. The indicator light will illuminate when the unit is powered on.

4.2 Spela en skiva
- Place a record on the turntable platter. Handle records by the edges and center label to avoid damaging the grooves.
- Select the appropriate rotation speed (33 or 45 RPM) using the buttons on the control panel.
- Tryck på START/STOP-knappen för att starta tallriksrotationen.
- Lift the tonearm using the cueing lever and carefully position it over the desired groove on the record.
- Sänk långsamt ned signalstyrningsspaken för att försiktigt placera pennan på skivan.
- At the end of playback, lift the tonearm using the cueing lever and return it to the tonearm rest. Press the START/STOP button to stop platter rotation.
4.3 Bluetooth-parning
Så här kopplar du ihop med en Bluetooth-enhet:
- Ensure the turntable is powered on and the 'PHONO T LINE / &#'x24; ' switch is set to '&#'x24; '.
- Sätt din Bluetooth-högtalare eller hörlurar i parkopplingsläge.
- Press and hold the Bluetooth button on the turntable's control panel until the indicator light flashes, indicating pairing mode.
- Once connected, the Bluetooth indicator light will illuminate steadily.
5. Underhåll
5.1 Rengöring av pennan
Regularly clean the stylus using a soft brush designed for stylus cleaning. Brush gently from back to front to remove dust and debris. A dirty stylus can cause distorted sound and damage your records.
5.2 Cleaning the Unit and Dust Cover
Wipe the turntable unit and dust cover with a soft, dry cloth. For stubborn marks, use a slightly damp trasan och torka sedan noggrant. Undvik att använda starka kemikalier eller slipande rengöringsmedel, eftersom dessa kan skada ytan.
5.3 Replacing the Stylus
The stylus has a limited lifespan and should be replaced periodically (typically after 300-500 hours of playback) to maintain sound quality and prevent record wear. Refer to the cartridge manufacturer's instructions for specific stylus replacement procedures.
6. Felsökning
If you experience issues with your turntable, consult the following common troubleshooting tips:
- Inget ljud: Check all audio cable connections, ensure the 'PHONO T LINE / &#'x24; ' switch is set correctly (LINE for built-in preamp, PHONO for external preamp, &#'x24; for Bluetooth), and verify your ampAtt högtalarna/ljudkontrollerna är påslagna och inställda på rätt ingång.
- Förvrängt ljud: Ensure the stylus is clean and properly seated. Check the tonearm balance and anti-skating settings. Verify that the record is clean and free of dust.
- Felaktig hastighet: Confirm that the correct speed (33 or 45 RPM) is selected for the record being played.
- Bluetooth-anslutningsproblem: Ensure both the turntable and your Bluetooth device are in pairing mode and within range. Try restarting both devices.
- Brummande ljud: Ensure the PHONO EARTH lead is properly connected if using PHONO OUT. Check for any nearby electronic devices causing interference.
For further assistance, refer to the official Technics support resources or contact customer service.
7. Specifikationer
| Särdrag | Specifikation |
|---|---|
| Stämpla | Teknik |
| Modellnamn | SL-40CBT |
| Artikelnummer | SL-40CBT-H |
| Färg | Grå |
| Material | Aluminium |
| Stil | Samtida |
| Objektets vikt | 22.5 pund |
| Paketets mått | 21.5 x 17.5 x 9.63 tum |
| Signal-brusförhållande | 60 dB |
| Inkluderade komponenter | AC-adapter |
| UPC | 885170444584 |
8. Garanti och support
8.1 Produktgaranti
This product is covered by a manufacturer's warranty. Please refer to the warranty card included with your product or the official Technics webwebbplatsen för detaljerad information om garantivillkor, bestämmelser och varaktighet.
8.2 Kundsupport
For technical support, service, or inquiries, please visit the official Technics support website or contact their customer service department. Contact information can typically be found in your product documentation or on the Technics brand webplats.