1. Introduktion
Thank you for choosing the KEENSTAR 20Bar Espresso Machine. This manual provides essential information for the safe operation, maintenance, and troubleshooting of your new espresso machine. Please read it thoroughly before first use and keep it for future reference.
2. Viktiga säkerhetsinstruktioner
- Läs alla instruktioner innan du använder apparaten.
- Rör inte vid heta ytor. Använd handtag eller knoppar.
- För att skydda mot brand, elektriska stötar och personskador, doppa inte sladd, stickpropp eller apparat i vatten eller annan vätska.
- Noggrann övervakning är nödvändig när någon apparat används av eller i närheten av barn.
- Dra ur kontakten från uttaget när den inte används och före rengöring. Låt svalna innan du sätter på eller tar av delar och innan du rengör apparaten.
- Använd inte någon apparat med en skadad sladd eller kontakt eller efter att apparaten inte fungerar eller har skadats på något sätt.
- Användning av tillbehör som inte rekommenderas av apparatens tillverkare kan leda till brand, elektriska stötar eller personskador.
- Använd inte utomhus.
- Låt inte sladden hänga över kanten på bordet eller bänken eller vidrör heta ytor.
- Placera inte på eller nära en het gas- eller elektrisk brännare, eller i en uppvärmd ugn.
- Anslut alltid kontakten till apparaten först, sedan sladden till vägguttaget. För att koppla ur, vrid valfri kontroll till "av" och dra sedan ut kontakten ur vägguttaget.
- Använd inte apparaten för annat än avsett ändamål.
- Var extremt försiktig när du gör dig av med het ånga.
- Denna apparat är endast avsedd för hushållsbruk.
3. Paketets innehåll
Kontrollera förpackningens innehåll vid uppackning för att säkerställa att alla artiklar finns med och är oskadade.
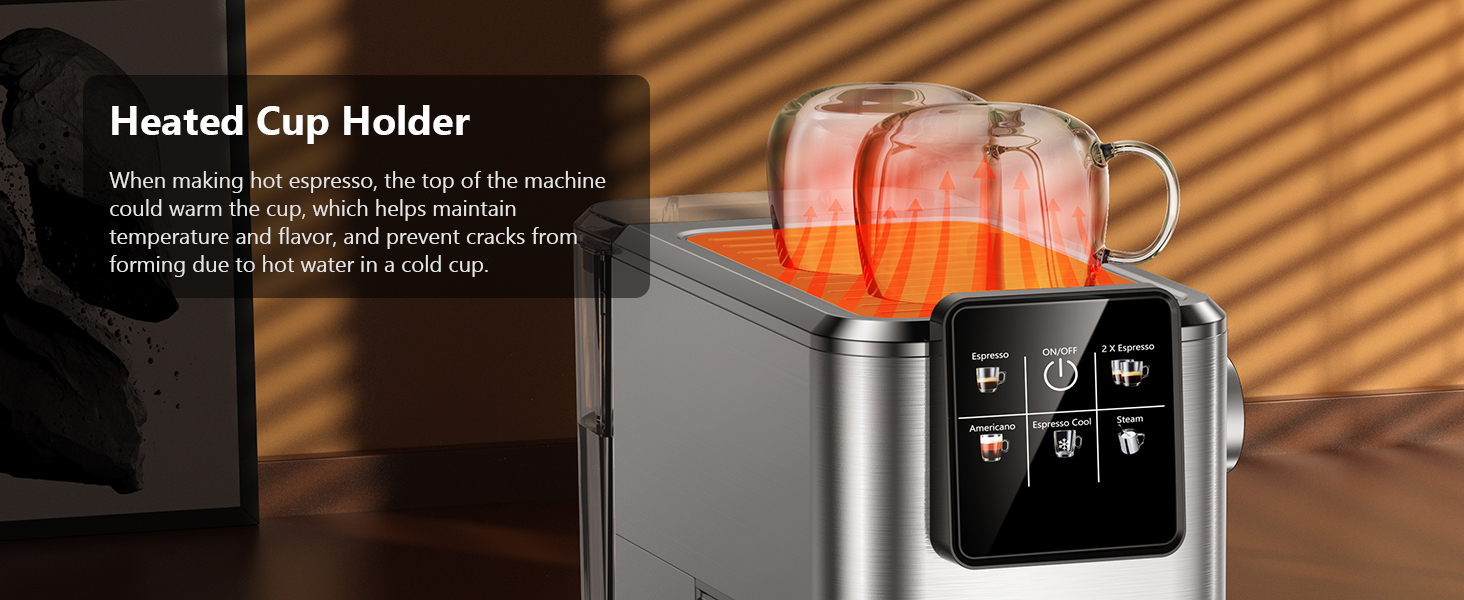
Bild: All components included in the KEENSTAR 20Bar Espresso Machine package. This includes the main unit, portafilter with handle, single and double shot filters, coffee spoon with tamper, and a removable drip tray. The water tank and steam nozzle are also visible.
- KEENSTAR 20Bar Espresso Machine Main Unit
- Portafilterhandtag
- 1-Shot Filter Basket
- 2-Shot Filter Basket
- Kaffesked med Tamper
- Avtagbar droppbricka
- Användarmanual
4. Produkt överview
Familiarize yourself with the various parts of your espresso machine.

Bild: Främre view of the KEENSTAR 20Bar Espresso Machine, showcasing its sleek stainless steel design and key operational areas.
- Vattentank: Detachable, 1.1 Liter capacity. Located at the back of the machine.
- Kontrollpanel: Intuitive touch screen for selecting brew options (Espresso, Americano, Espresso Cool, Steam, ON/OFF, 2X Espresso).
- Portafilter: Rymmer malet kaffe för bryggning.
- Ångstav: For frothing milk for lattes and cappuccinos. Features a 360-degree rotation.
- Droppbricka: Avtagbar för enkel rengöring.
- Heated Cup Holder: Located on top of the machine to warm cups, maintaining coffee temperature.
5. Inställning
5.1 Initial Use and Priming
Before first use, or if the machine has not been used for a long time, it is essential to prime the system to ensure proper operation and remove any air from the pipes.
- Fill the water tank with fresh water and place it back into the machine. Ensure the tank cover is properly closed.
- Plug the machine into a power outlet. The ON/OFF button on the touch screen will illuminate.
- Press the ON/OFF button to turn on the machine. The indicator lights will blink as the machine preheats.
- Once the indicator lights are steady, the machine is ready.
- Placera en tom kopp under ångstaven.
- Turn the steam knob to the "ON" position. Water will run out from the steam wand like a line. Let it run for about 10-15 seconds to purge air.
- Turn the steam knob to the "OFF" position.
- Press the ON/OFF button to turn off the machine. The machine is now primed and ready for use.

Bild: Visual steps for priming the espresso machine before its first use or after a period of inactivity. This process drains air from the internal pipes.
5.2 Vattentank fyllning
The water tank has a maximum capacity of 1200ml. Do not exceed the maximum fill line to prevent overflow.
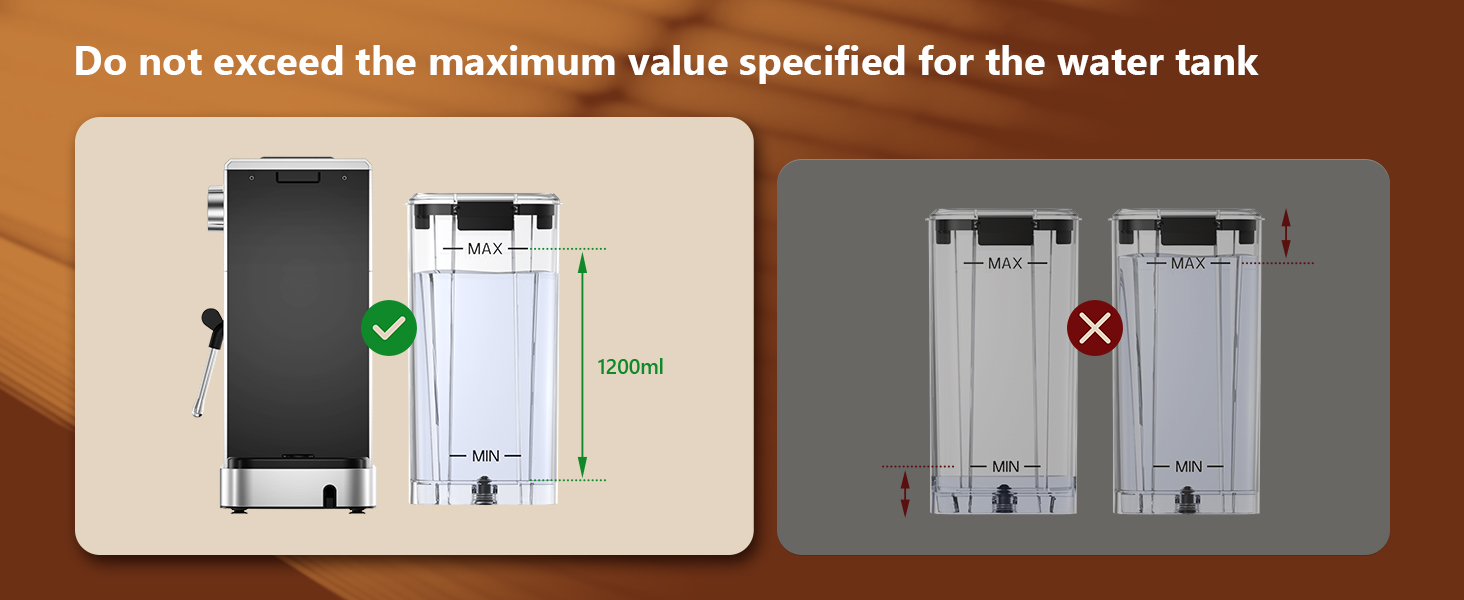
Bild: Guidance on filling the water tank, indicating the 1200ml maximum fill level to avoid overfilling.
6. Bruksanvisning
6.1 Bryggning av espresso
The machine features a 20-bar pressure system and pre-soak technology for rich espresso extraction.
- Ensure the steam knob is set to the "OFF" position before brewing coffee.
- Fill the water tank with fresh water and press the ON/OFF button to power on. Wait for the indicator to become steady, signifying preheating is complete.
- Select the appropriate filter basket (1-shot or 2-shot) and place it into the portafilter.
- Add ground coffee to the filter basket. Use medium ground coffee (greater than 0.5mm) for optimal results.
- Tamp the ground coffee firmly and evenly using the coffee tampeh.
- Attach the portafilter to the machine, ensuring it is fully locked into place.
- Placera koppen/kopparna på droppbrickan under portafiltret.
- Select "Espresso" for a single shot or "2 X Espresso" for a double shot on the touch screen. The machine will begin brewing.
- När bryggningen är klar stannar maskinen automatiskt.

Bild: Step-by-step visual instructions for brewing espresso, from preparing the machine to the final extraction.
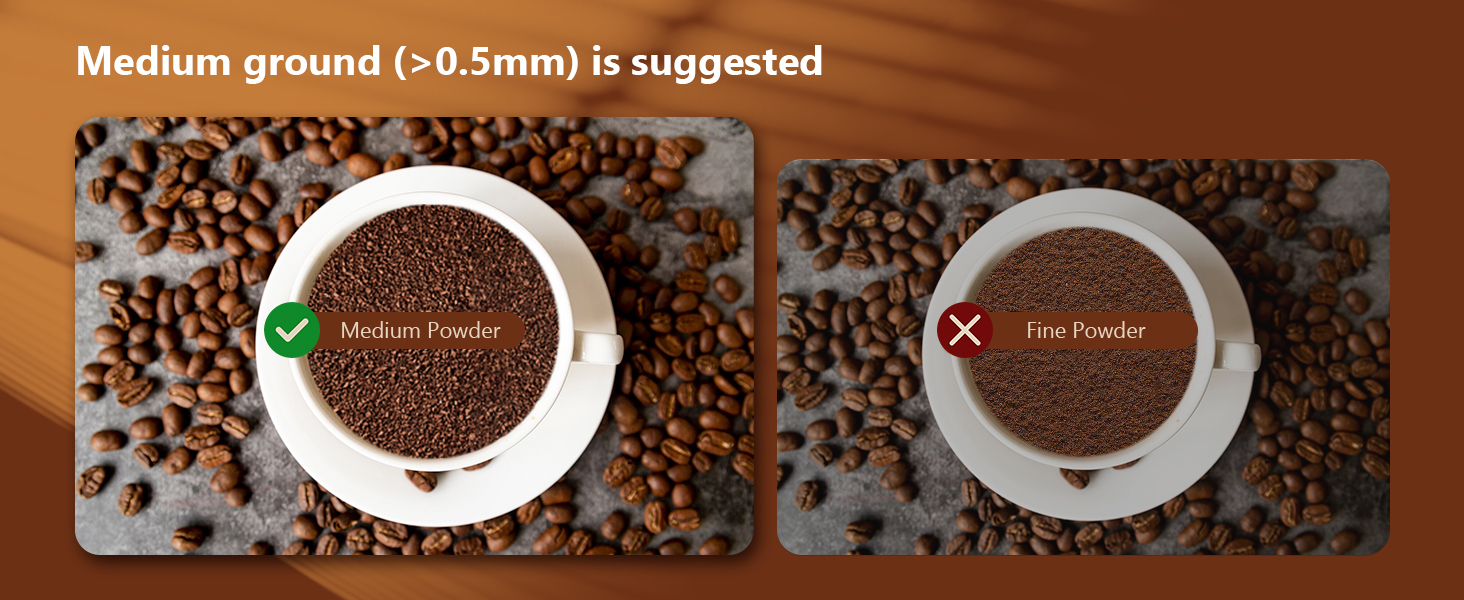
Bild: Illustration demonstrating the correct way to lock the portafilter before brewing to prevent leaks and ensure proper extraction.

Bild: Recommended coffee grind size (medium, >0.5mm) for optimal espresso extraction, contrasting it with fine ground coffee.
6.2 Making Cold Brew Espresso
This machine offers a rapid cold brew function, producing smooth cold brew in as little as 10 minutes.
- Ensure the water tank is filled with iced water for the cold brew function.
- Prepare the portafilter with ground coffee as described in Section 6.1.
- Attach the portafilter to the machine and place a cup underneath.
- Select "Espresso Cool" on the touch screen. The machine will begin the cold brew process.
- Enjoy your rapid cold brew espresso.

Bild: The espresso machine preparing cold brew, emphasizing the requirement for iced water in the tank.
6.3 Skumma mjölk
The powerful steam wand allows you to create creamy microfoam for lattes and cappuccinos.
- Fill the water tank with fresh water and press the ON/OFF button to power on.
- Press the "Steam" button on the touch screen to preheat the steam function. The indicator will blink during preheating and become steady when ready.
- After preheating, turn the steam knob to the "ON" position to release any remaining water in the pipe before frothing.
- Insert the steam nozzle approximately 1 inch into the surface of your milk.
- Gradually turn the steam knob to increase steam until the desired foam consistency is achieved.
- Once finished, turn the steam knob to the "OFF" position and clean the steam wand immediately.
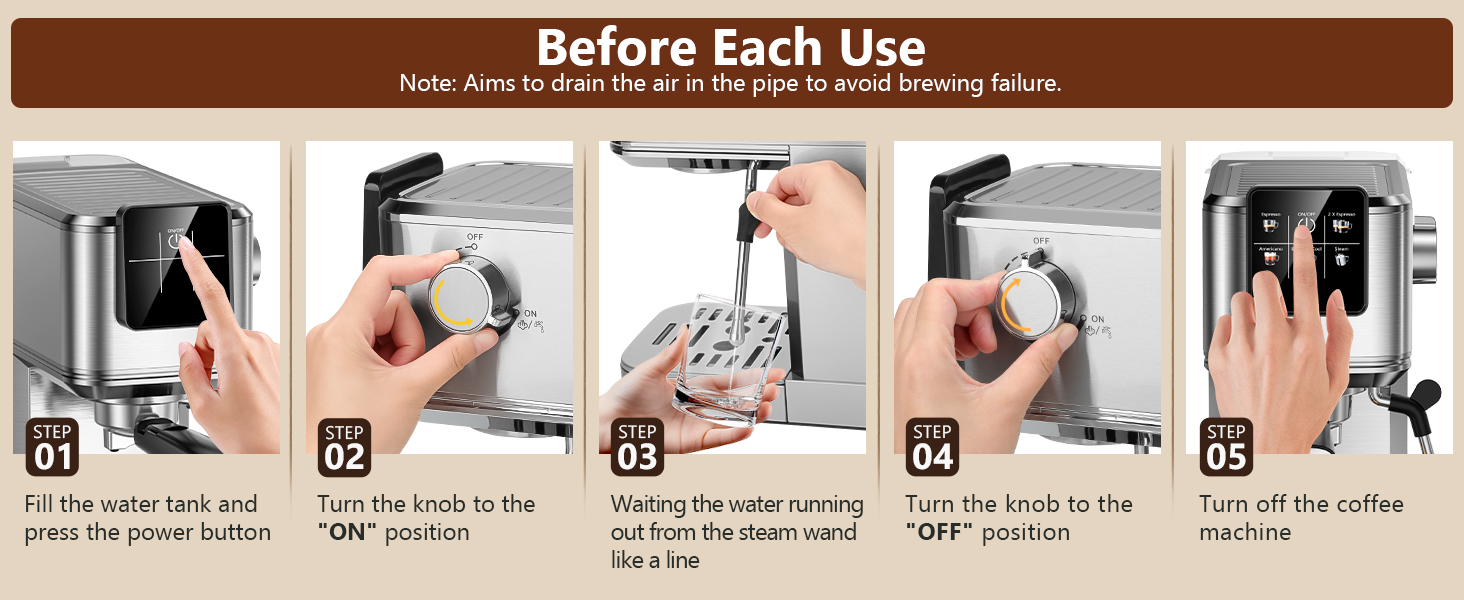
Bild: Visual instructions for frothing milk, detailing the steps from preheating to creating microfoam.
7. Underhåll och rengöring
Regelbunden rengöring säkerställer att din espressomaskin håller länge och presterar optimalt.
- Allmän städning: Torka av maskinens utsida med adamp trasa. Använd inte slipande rengöringsmedel eller skurmedel.
- Droppbricka: The removable drip tray should be emptied and cleaned regularly.
- Portafilter och filterkorgar: After each use, remove the portafilter and discard used coffee grounds. Rinse the portafilter and filter basket under running water.
- Ångstav: Torka av ångröret med en reklamfilm omedelbart efter att du har skummat mjölken.amp cloth to prevent milk residue from drying. Purge steam briefly to clear any internal blockages.
- Vattentank: Rengör vattentanken regelbundet med ett milt rengöringsmedel och skölj noggrant.
- Avkalkning: Depending on water hardness, descale the machine every 2-3 months. Follow the instructions provided with a suitable descaling solution.

Bild: Important cleaning instruction: All accessories must be washed by hand and are not dishwasher safe.
8. Felsökning
Se det här avsnittet för vanliga problem och deras lösningar.
| Problem | Möjlig orsak | Lösning |
|---|---|---|
| Inget kaffe kommer ut / Långsamt flöde |
|
|
| Water leaks from portafilter edge |
|
|
| Ångröret producerar inte ånga |
|
|
| Kaffet är inte tillräckligt varmt |
|
|
9. Specifikationer
- Stämpla: KEENSTAR
- Modellnamn: JH-C5210
- Trycksystem: 20 bar
- Driva: 1350W
- Vattentankens kapacitet: 1.1 liter (37 oz)
- Produktmått: 11.8" D x 12.6" B x 5.5" H
- Artikelvikt: 4.6 pund
- Material: Rostfritt stål
- Specialfunktion: Programmable, Touch Screen, Milk Frother, Hot & Rapid Cold Brew
- Typ av kaffeinmatning: Malet kaffe
- Filtertyp: Återanvändbar
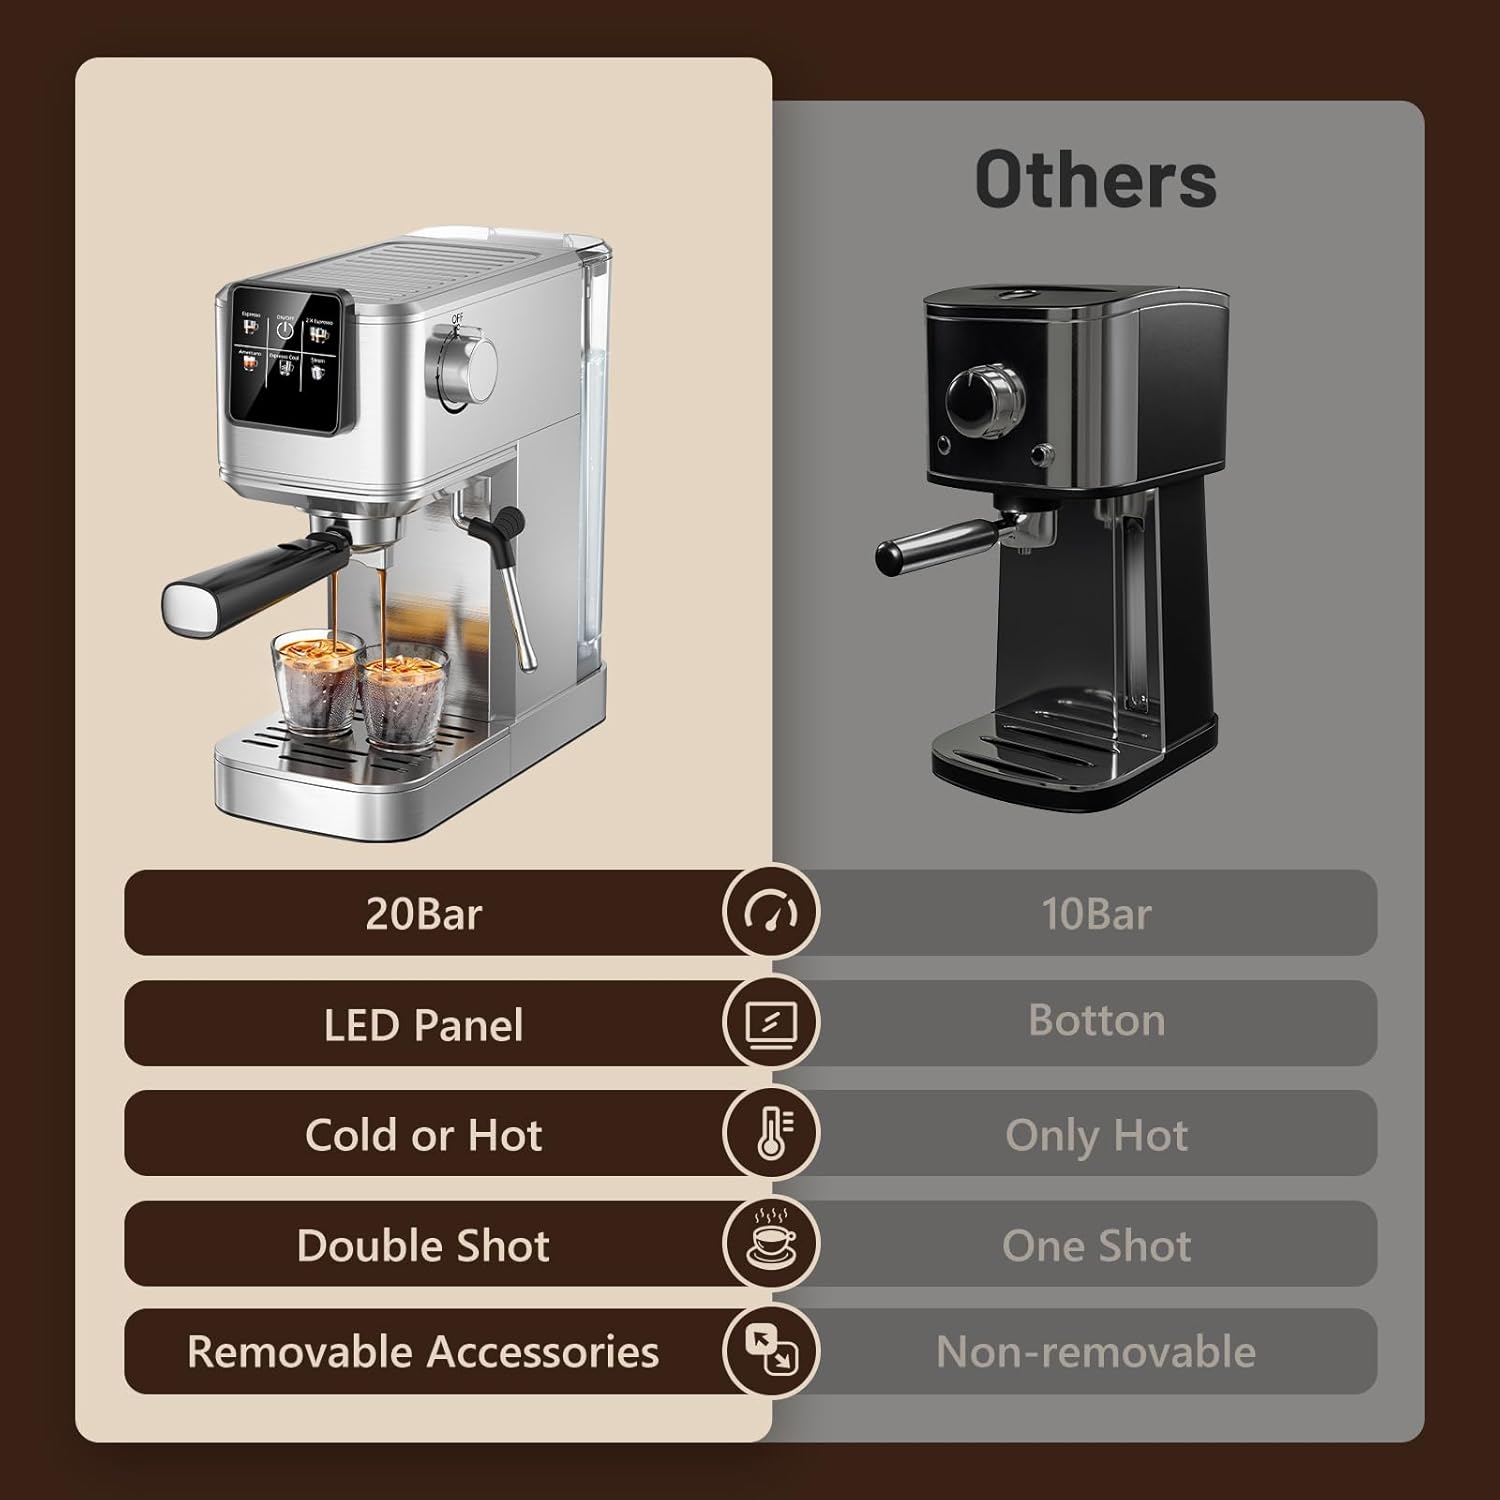
Bild: Feature comparison of the KEENSTAR machine, emphasizing its 20Bar pressure, LED panel, and versatility for hot and cold beverages.

Bild: Dimensions of the KEENSTAR espresso machine, indicating its compact size.
10. Garanti och support
For warranty information or technical support, please refer to the contact details provided on the product packaging or visit the official KEENSTAR webwebbplats. Spara ditt inköpsbevis för eventuella garantianspråk.